How-to — task-oriented recipe.
Create and use Saved views in Classic Lists
Create saved views within a list based on your personal preferences (i.e. filters, sorts, and showing specific fields while hiding others). Create private views for yourself or shared views for your team members to access as well. Note: Saved views consist of the same data within a list. Removing a list entry from one saved view means it will be removed from the entire list, not just that saved view.How to create a saved view
- Click the + icon at the very right of the saved views currently open.
- Otherwise, apply filters, sorts, and manage columns to hide/show different columns on an existing view.
- Once you’ve made the relevant changes, click on the Save icon.
- Click Duplicate this view.
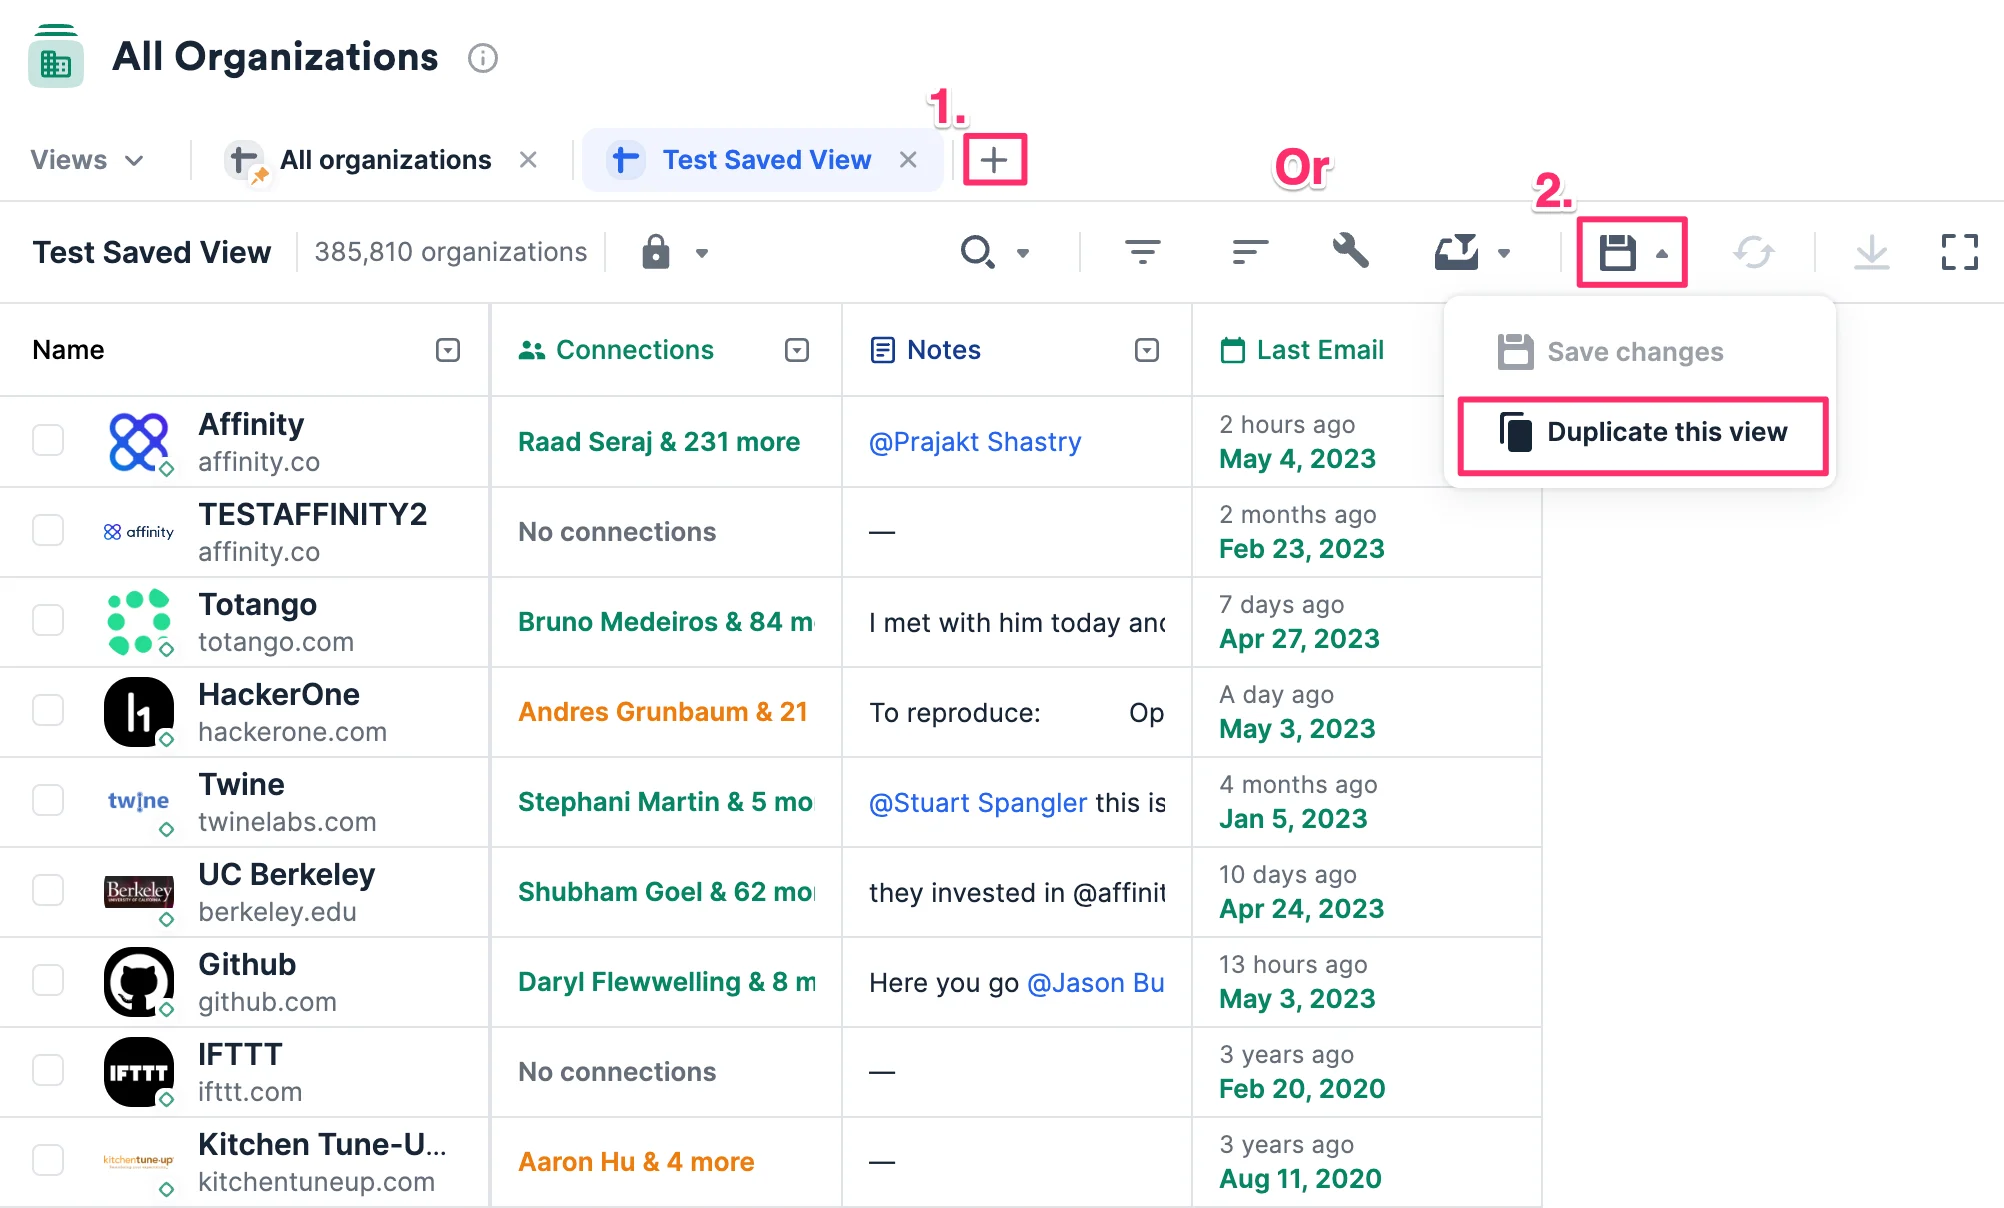
- Give your new saved view a name, then click Save.
How to rename a saved view
- You can rename a saved view if you fit one of the following criteria:
- You created the saved view.
- Your team member created the saved view, but has also allowed others with list access the ability to configure the saved view as well (see Step 2 in How to make a private view into a shared view).
- To rename a saved view, simply click on the saved view’s name next to the blue + button on the left side.
How to customize your saved view
- Customize your saved view by applying filters and sorts.
- Learn more about the specific functionality that the Customize View sidebar has to offer.
How to make a private view into a shared view
- Click the Lock icon, then click the Shared option.
- You can decide to turn the toggle on to allow all users who have list access to be able to save changes and configure the view, or keep the toggle off and limit changes for this view to just the list owner and list admins.

- For saved views that you created, you can always change them back to the Private option. You cannot change the permissions for saved views that you have **not **created.
How to pin a saved view for your team (List Owner and List Admins only)
Pinned Team Views within a list will be shown by default to all team members who access that list for the first time. They will be pinned to the left side of your saved views and denoted with the Pin icon, right next to the Views navigator.
- To replace the current team pinned view with another saved view, click the Views navigator.
- Then, hover over the saved view that you’d like to designate as the new team pinned view.
- Click the Pin icon to Pin as Team View.
Note: At this time, you are only able to pin 3 views at a time - one for each type of view: Sheet, Board, and Dashboard.
How to favorite a saved view for yourself
The Star icon will now help you easily distinguish which saved views are your favorites. You can favorite both private views you created yourself, as well as shared views created by anyone on the team.- To favorite a saved view for yourself, click the Views navigator.
- Then, hover over the saved view that you’d like to mark as a favorite and click the Star icon.

How to update a saved view
- Make the necessary changes to the saved view, then click the Save icon and click Save changes.
- If it is disabled for you, it means you are not the list owner/list admin. In that case, you can click Duplicate this view instead.

How to delete a saved view
- Click the Views navigator on the left side and hover over the saved view that you’d like to delete.
- Click on the Trash icon, then click Delete to confirm. Please note, you are not deleting the list entries from the list, you are simply deleting this view - the list entries will remain as is.

Create and use saved views in new Lists
Create and manage saved views to quickly access your preferred List configurations. In New Lists, saved views now preserve filters and sorts along with column selections, and support view variants that maintain compatibility with Classic Lists while enabling advanced features.Prerequisites
- Access to a List in Affinity
- Understanding of filters and sorts (optional but helpful)
- Edit permission on the List for creating views
Part 1: Create a New Saved View
Step 1: Configure Your View
- Open the List where you want to create a saved view
- Apply your desired configuration:
- Filters: Set up filter conditions (see How to Filter and Sort in New Lists)
- Sorts: Add sort orders (up to 5 in New Lists)
- Columns: Show/hide columns using Customize View panel
- Column order: Drag columns to reorder
- Column width: Resize columns as needed
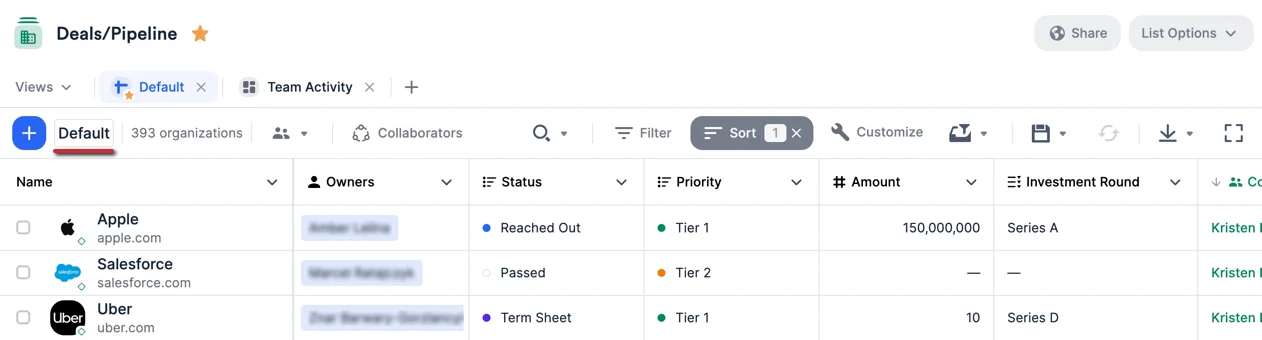
Step 2: Save the View
- Click the Save button (appears when you have unsaved changes)

- The Save View modal appears
- Click Save.
Step 3: Verify View Creation
- Your new view appears in the view selector dropdown
- Click the view selector to see your new view in the list
- Views are in alphabetical order, with an icon to indicate if private or shared.
Part 2: Use and Switch Between Views
Switching Views
- Click the view selector dropdown (shows current view name)

- Select any view from the list:
- Pinned views: Appear at top with pin icon (team defaults)
- Your private views: Your personal views
- Shared views: Team views everyone can access
- List immediately updates to show that view’s configuration
Using View Variants (New Lists Only)
If a view has both New and Classic variants:- Look for the unlinked or branched label in view header

- Toggle between:
- New Lists variant: Advanced filters, more sorts, New Lists features
- Classic Lists variant: Simpler configuration, Classic-compatible
- Use whichever variant suits your current needs
- New Lists variant: When you need advanced features or more control
- Classic variant: When sharing context with Classic Lists users or wanting simpler setup
Part 3: Update an Existing Saved View
Step 1: Make Changes
- Open the view you want to update
- Make your changes:
- Add/remove filters
- Adjust sorts
- Show/hide columns
- Reorder or resize columns
- Unsaved changes indicator appears
Step 2: Save
To save changes:- Click Save button
- Click Save changes
- View updates for everyone with access (if Shared)
Part 4: Save as a New View
When to Save as a new view
- Experimenting without affecting shared team view
- Creating personal variant of team view
- Testing filter combinations before committing
- Building multiple similar views for different purposes
Step 1: Duplicate the View
- Open the view you want to duplicate
- Click the view menu (three dots next to Save)

- Select **Save as New Sheet View **

- Duplicate modal appears
Step 2: Name and Save Duplicate
- Default name: “Copy of ORIGINAL”
- Rename to something descriptive
- Duplicated view includes:
- All Classic Lists configuration
- If duplicated in New Lists AND original has New variant: New Lists variant too
- If duplicated in Classic OR original has no New variant: No New variant (starts Linked to Classic)
- Click Save
Step 3: Customize Duplicate
- Make changes to your duplicated view
- Save changes
- Original view remains unchanged
Expected Outcome
- Saved views that instantly load your preferred configurations
- Ability to switch between multiple perspectives on your data
- Shared views enabling team collaboration and standardization
- Private views for personal workflows and experimentation
- View variants maintaining both New Lists and Classic Lists compatibility
- No need to recreate filters, sorts, or column layouts manually
Tips & Best Practices
View Creation:- Test before saving: Verify filters show expected data
- Name descriptively: “West Coast Active Deals” not “View 1”
- Start Private: Test personally before sharing with team
- Use duplication: Copy and modify rather than editing team views
- Delete unused views: Keep view selector clean
- Review quarterly: Archive or delete stale views
- Document complex views: Add notes in team wiki if filters are intricate
- Communicate changes: Tell team before updating shared views
- Toggle OFF for team views: Prevents accidental changes
- Toggle ON for collaborative views: When team co-manages configuration
- Private for experiments: Test before sharing
- Duplicate before editing: Never change team views directly
- Include owner: “Sarah’s Portfolio Review”
- Include purpose: “Data Cleanup - Empty Fields”
- Include geography: “EMEA Prospects”
- Include time: “Q4 2025 Pipeline”
- Use New Lists variant: When you need advanced filters or more sorts
- Use Classic variant: When collaborating with Classic Lists users
- Version toggle: Switch between variants as needed