How-to — task-oriented recipe.
Create custom fields in your Salesforce instance
You have the ability to enrich account and contact records in your Salesforce instance with dozens of Affinity Data fields, which contain important information about companies and individuals. To enable this, you’ll need to create custom fields in Salesforce for each Affinity field that you’ll want to sync.Part 1 - Creating custom fields for Account objects
- First, review the list of Affinity Data fields and how you can create their equivalents in Salesforce: Creating custom Salesforce fields based on Affinity Data fields
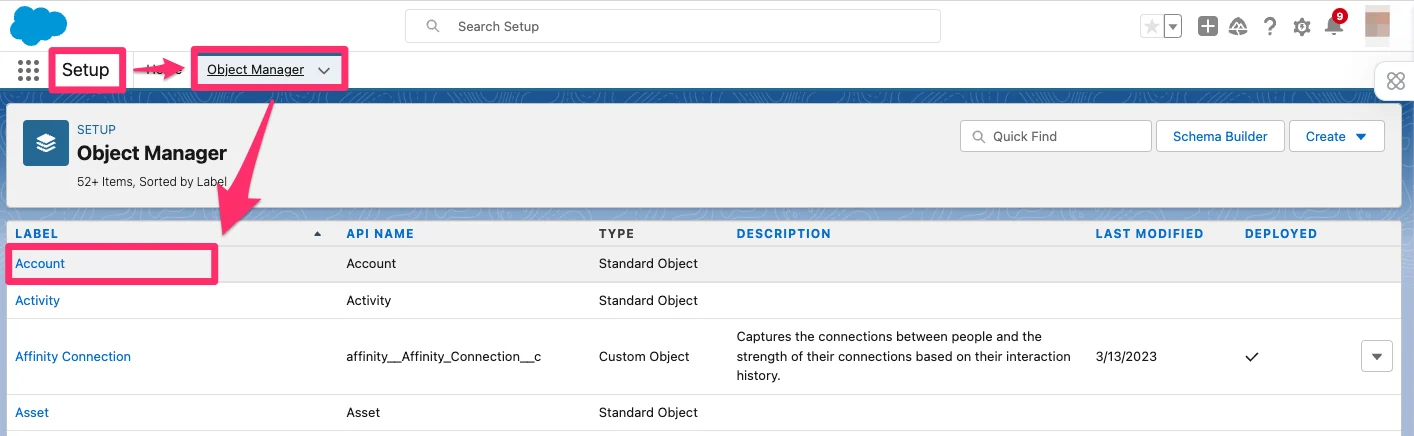
- When you’re ready to start creating these custom fields, go to Salesforce Setup. Then, click on the Object Manager tab and click the Account object.
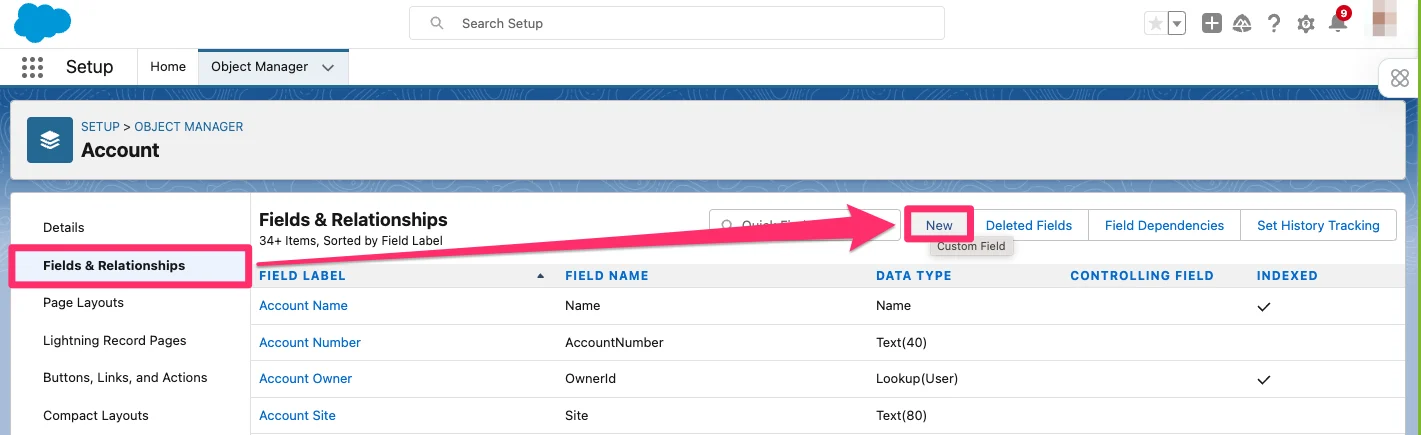
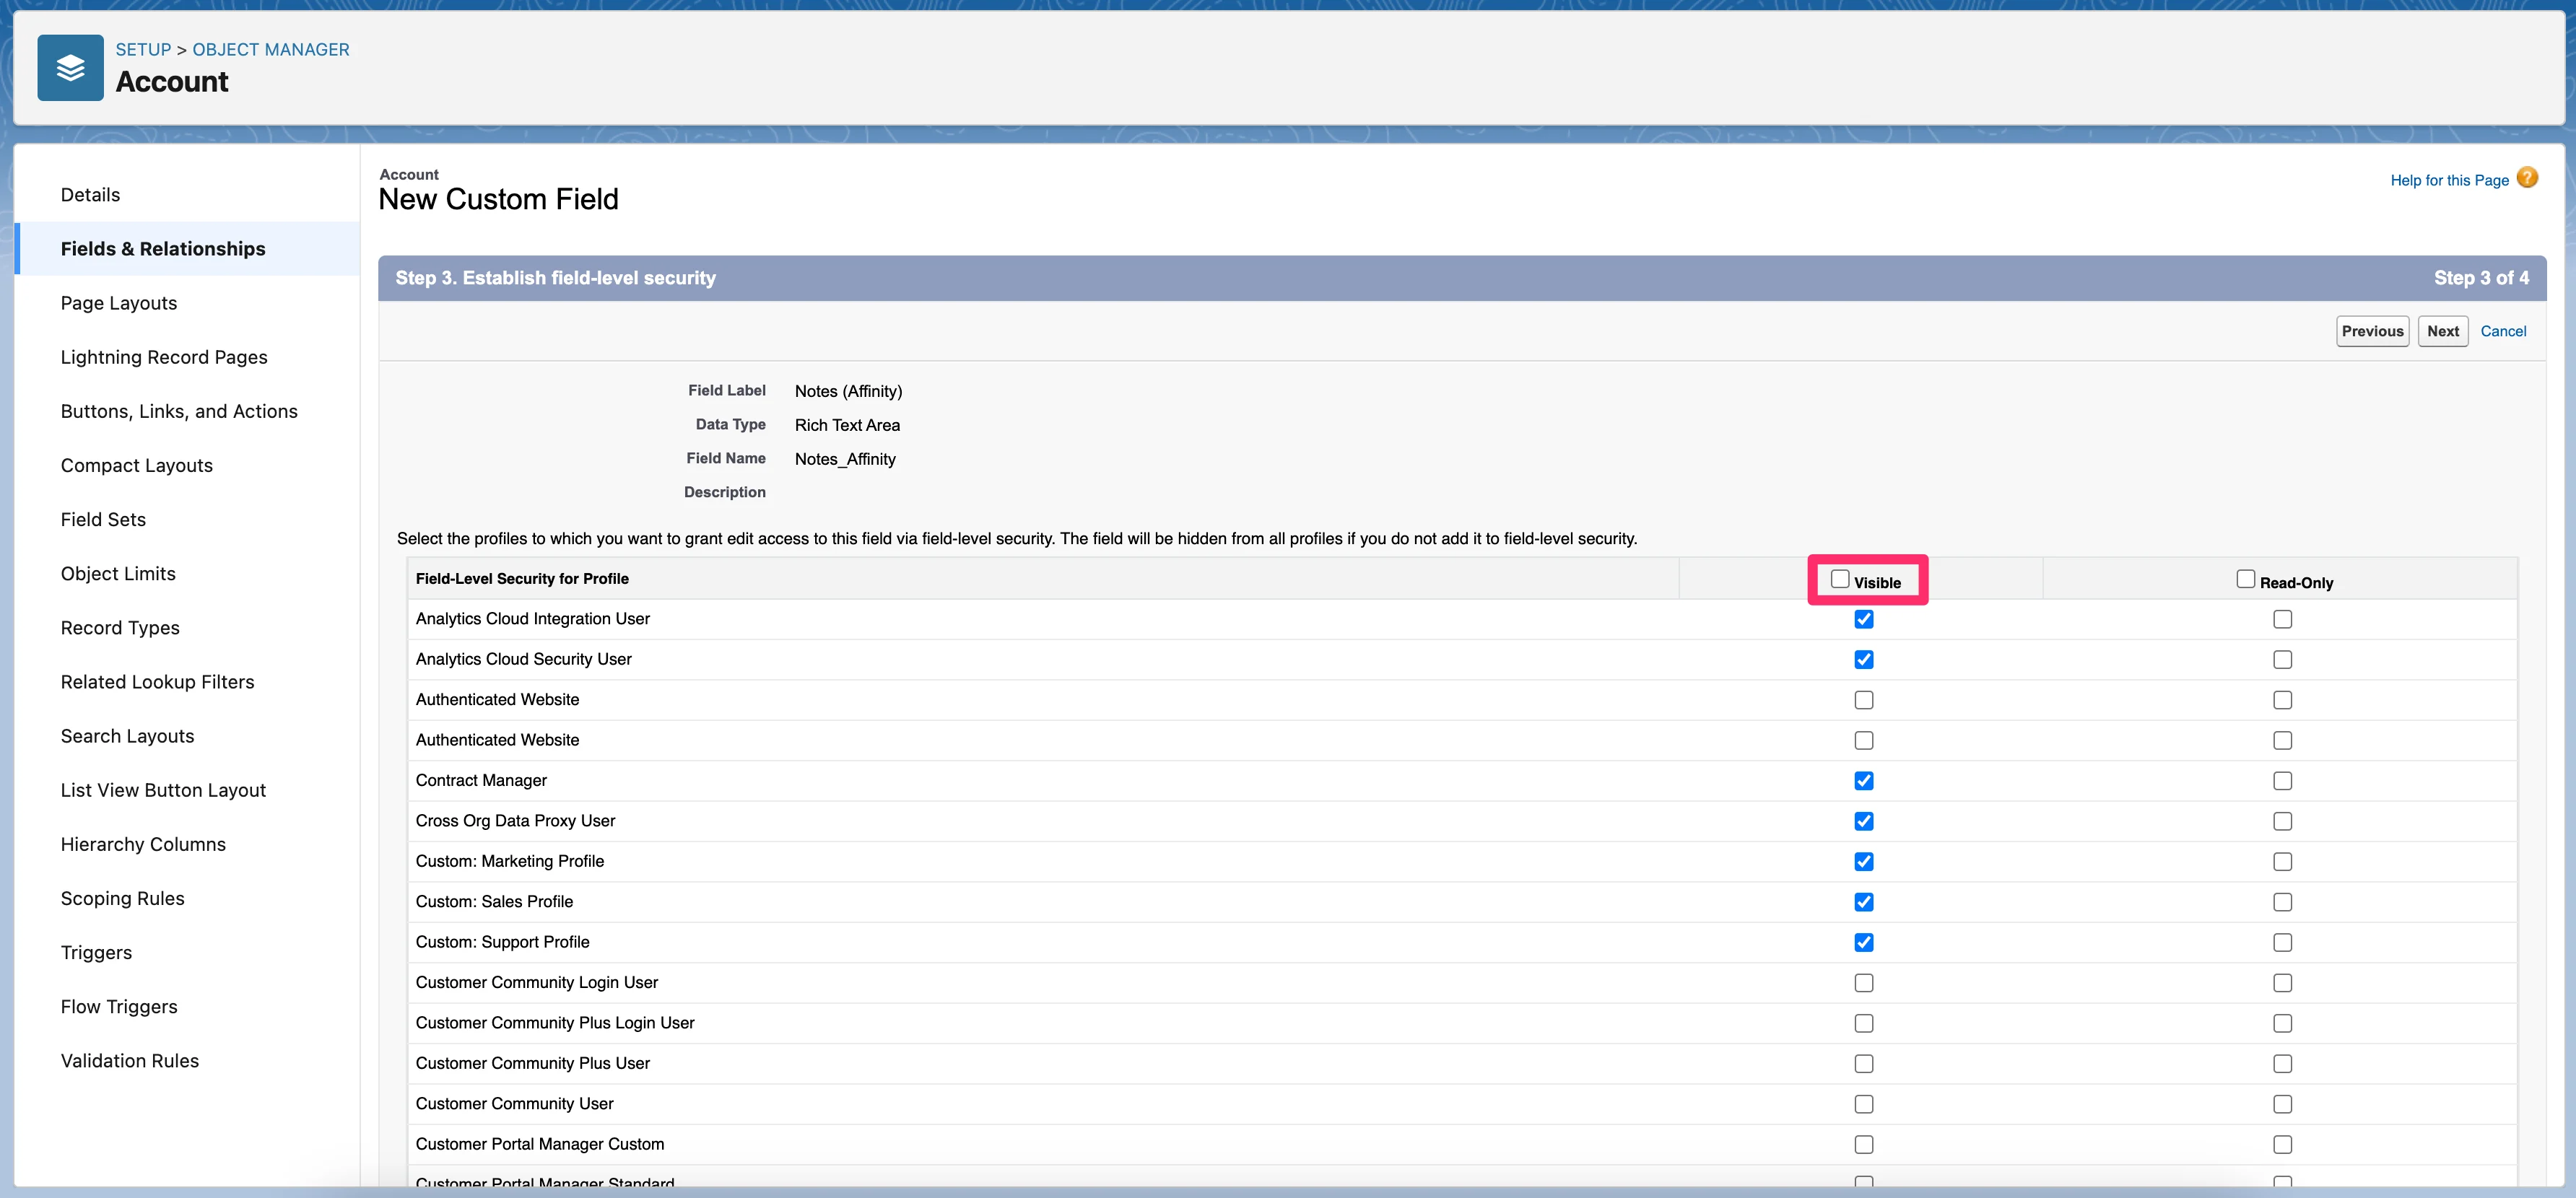
- Now, click on the Fields and Relationships tab, then click New to create a custom field.
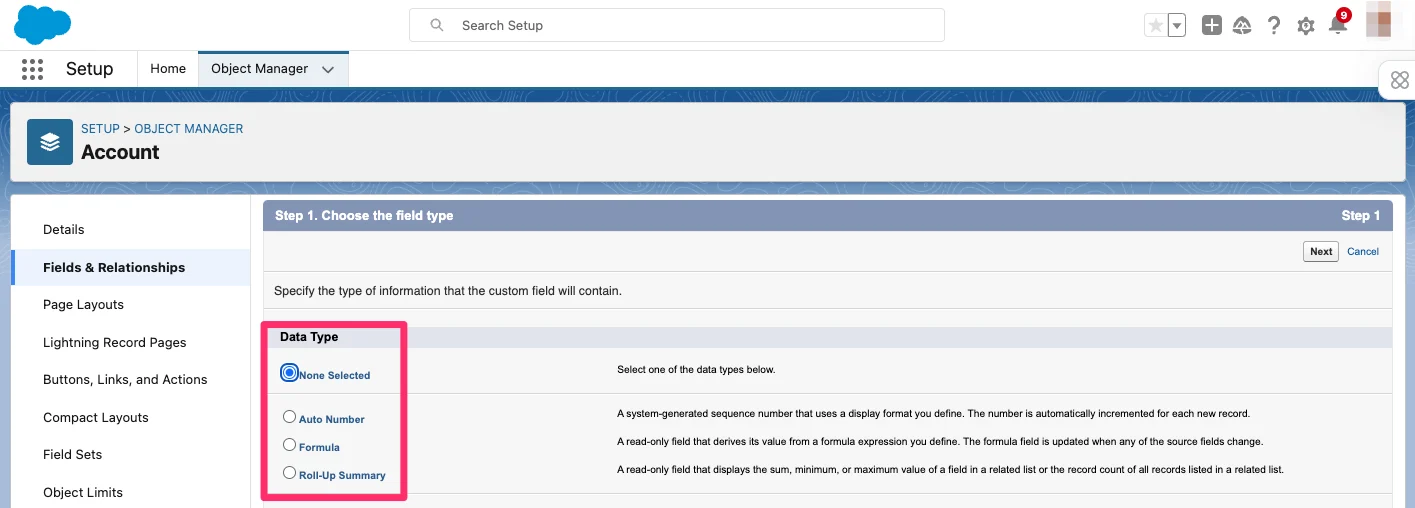
- Choose the Data Type that is most relevant based on the Affinity Data field you are choosing, then click Next.
- Now, click the checkbox next to Visible to make sure all available profiles have access to this field. You can also click the checkbox next to Read-Only if you’d like to prevent users from making edits to this field. Then, click Next.
- Repeat as necessary for each field that you want to sync.
Part 2 - Creating custom fields for Contact objects
Repeat steps 1-6 above, but for Contacts this time.Disable the “Send through External Email Services” feature
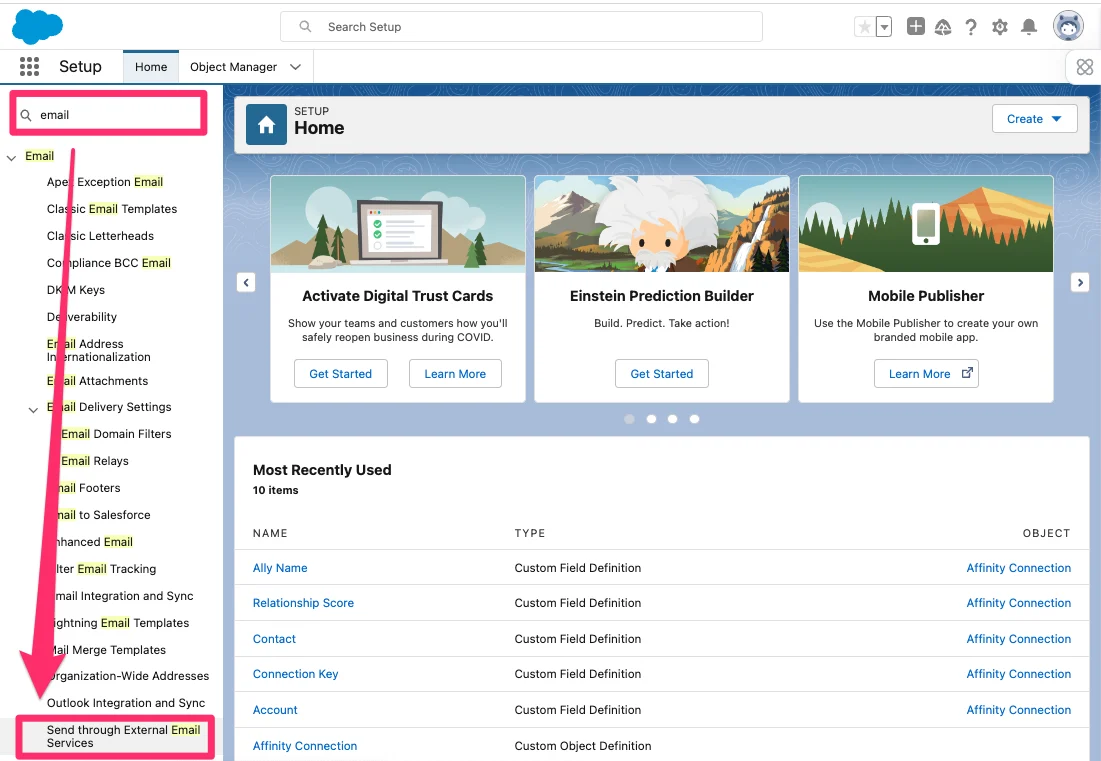
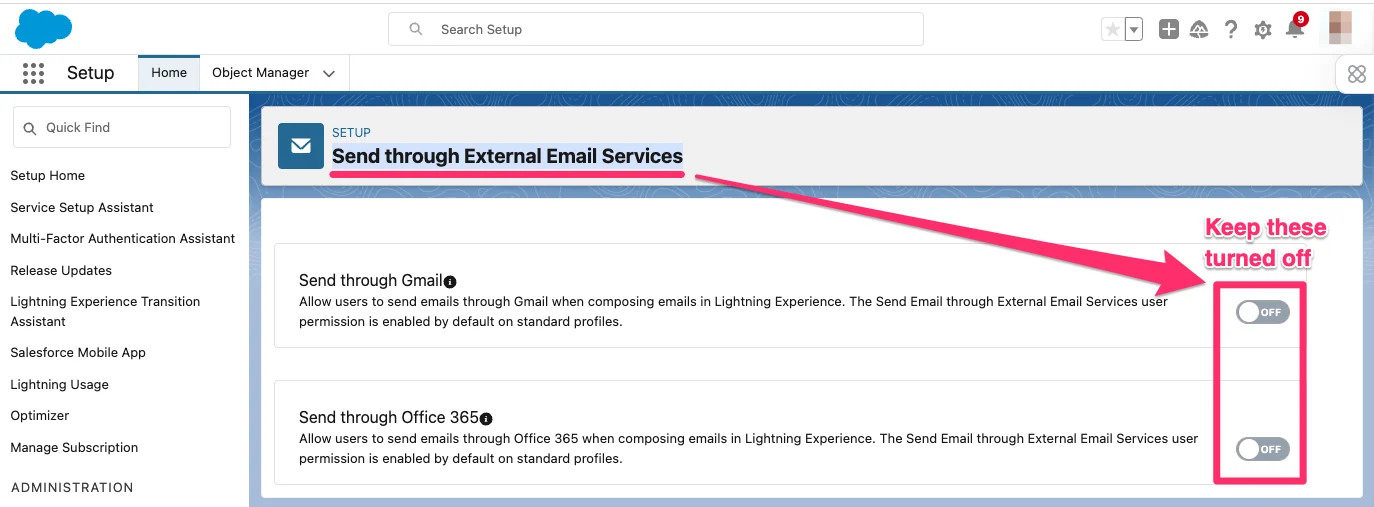
If your organization sends emails through the Salesforce email composer, then your Salesforce admin may have enabled the Send through External Email Services feature. This needs to be disabled moving forward, given that it would create duplicate activities alongside enrichment by Affinity for Salesforce.- Type “email” in the search bar and click the Send through External Email Services tab on the left-side navigation.
- Verify that the settings for Gmail and/or Office 365 are turned off.
Set up Affinity for Salesforce in Affinity
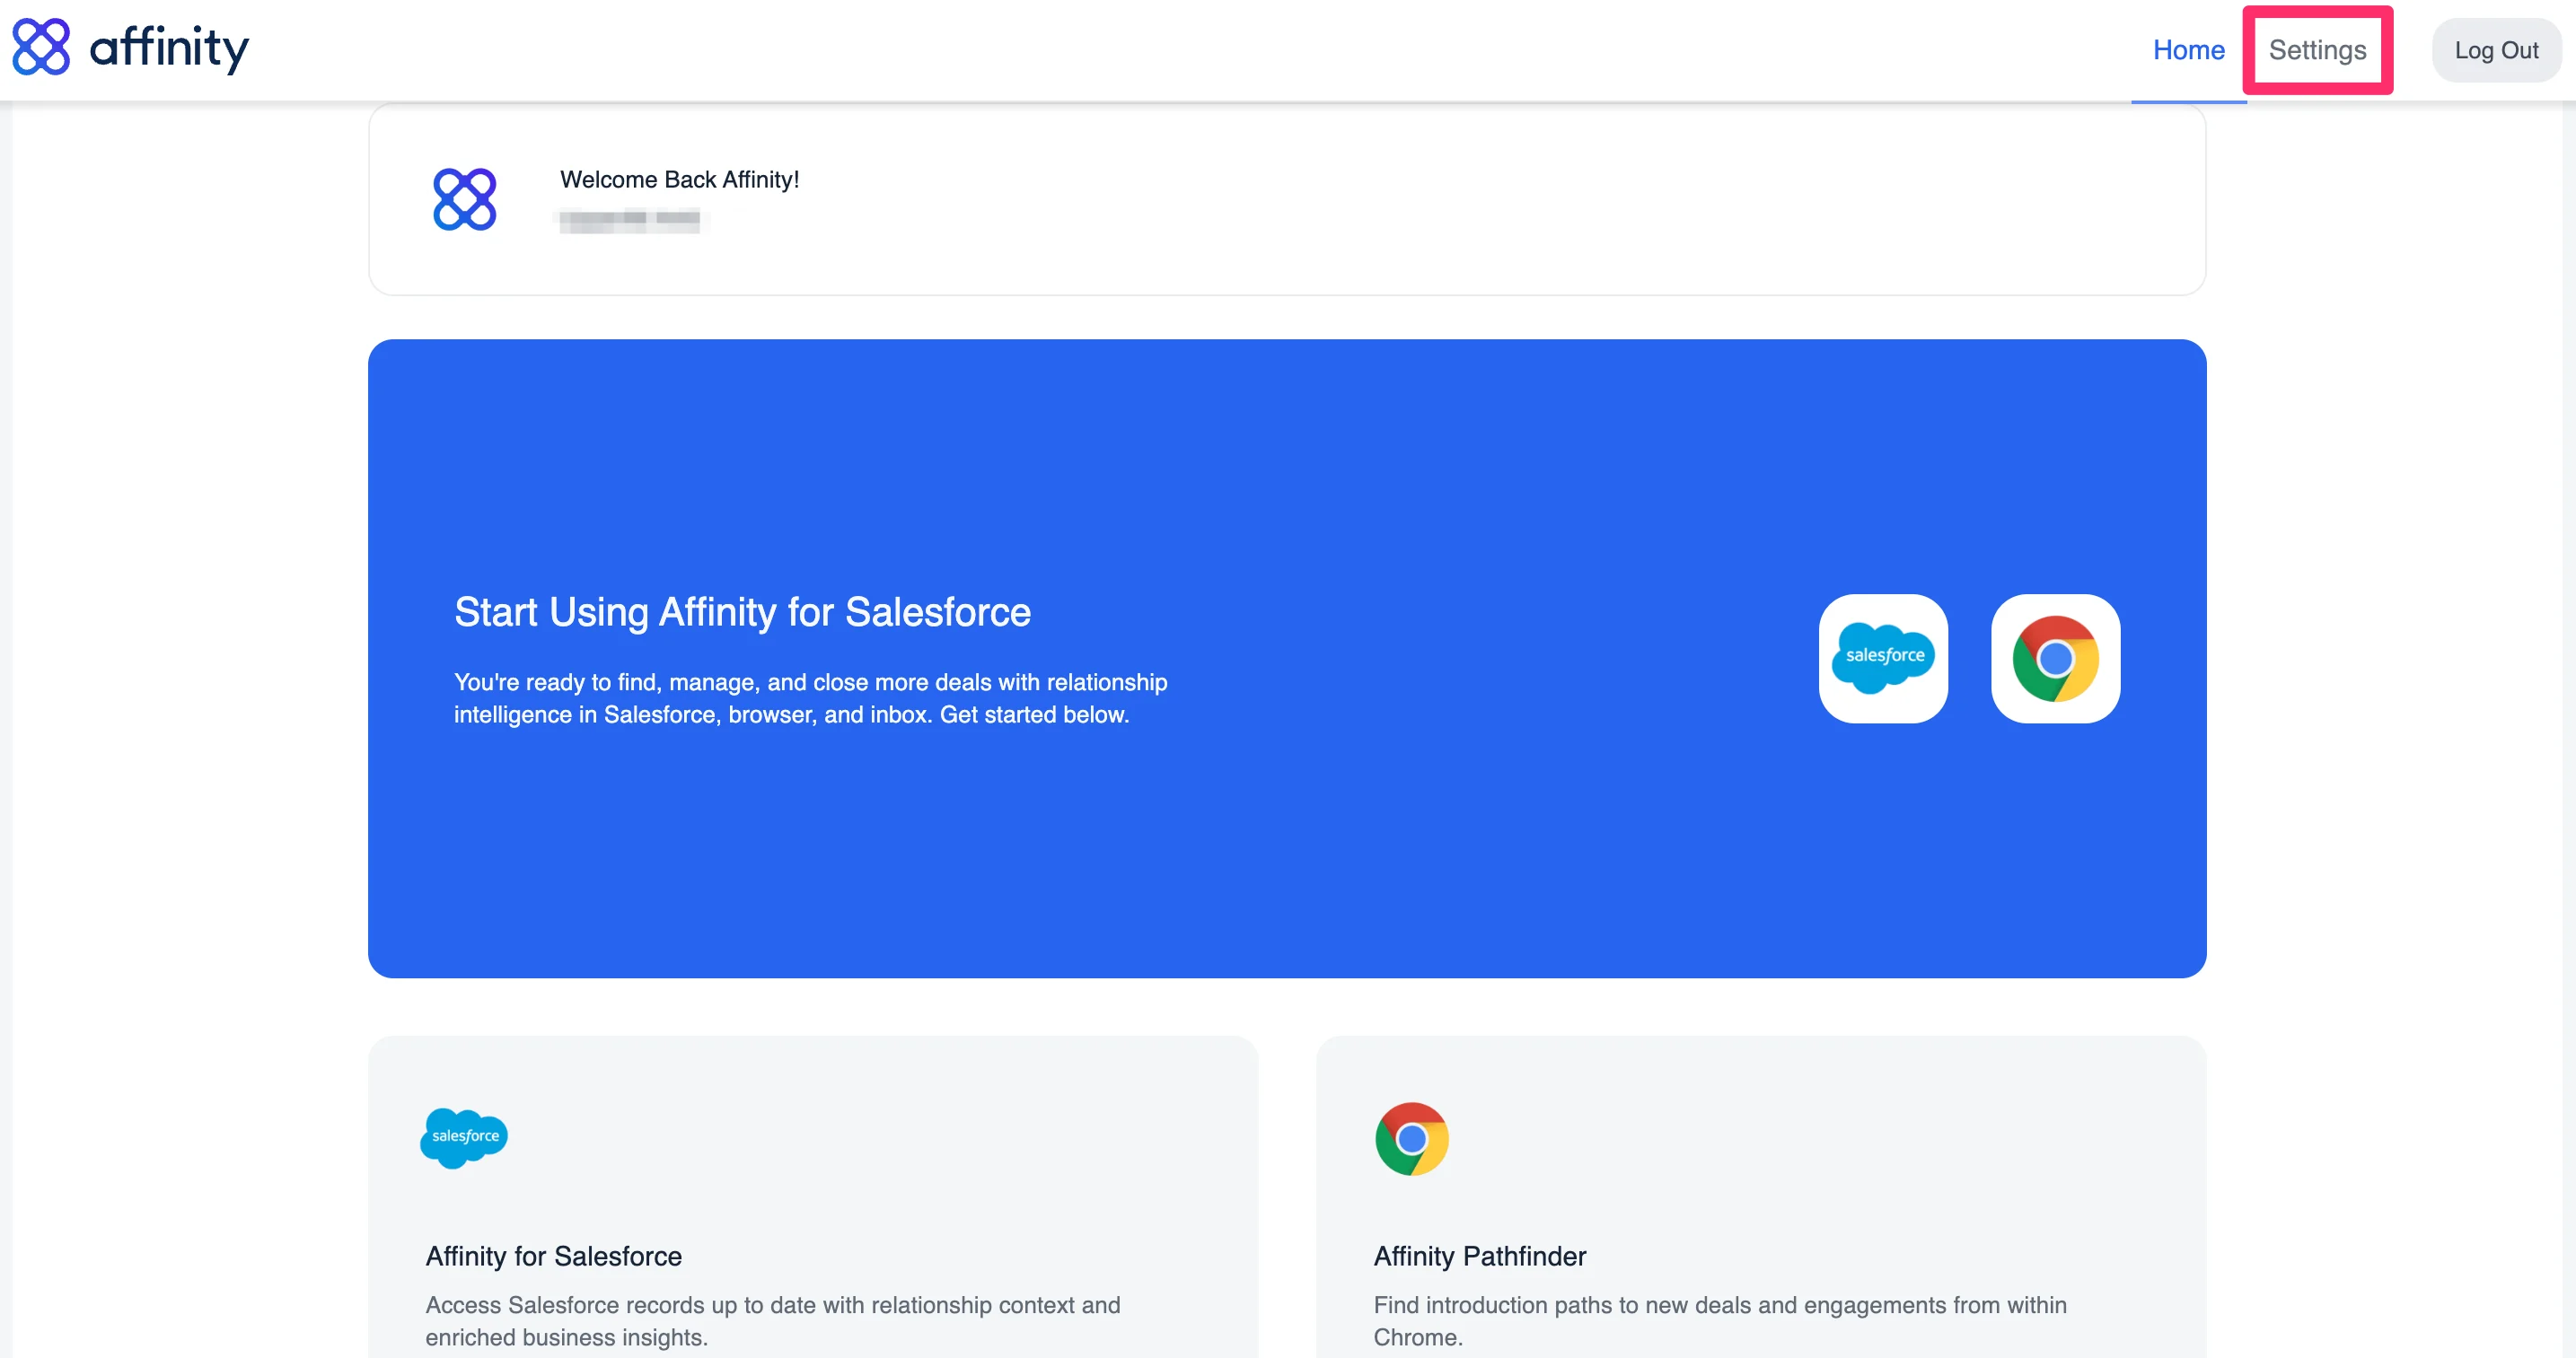
- Sign into your Affinity instance, then click on Settings in the top-right corner.
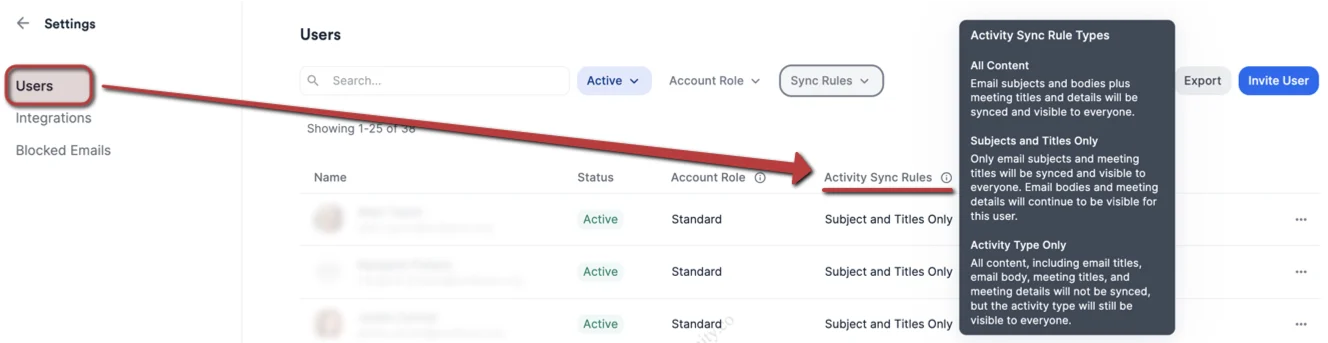
- From there, click on the Users tab on the left to invite users and set up their Activity Sync Rules.
- Important Callout: If you’d like to connect email aliases for any of your users, please reach out to your Affinity point of contact before sending out the invite.
- Important Callout: If you’d like to add Limited Seats (i.e. no access to the Affinity Pathfinder Chrome extension, Affinity for Outlook add-in, or the Affinity components inside your Salesforce instance), please follow this guide: Domain Verification Guide for Sync Only seats (Affinity CRM) and Limited seats (Affinity for Salesforce)
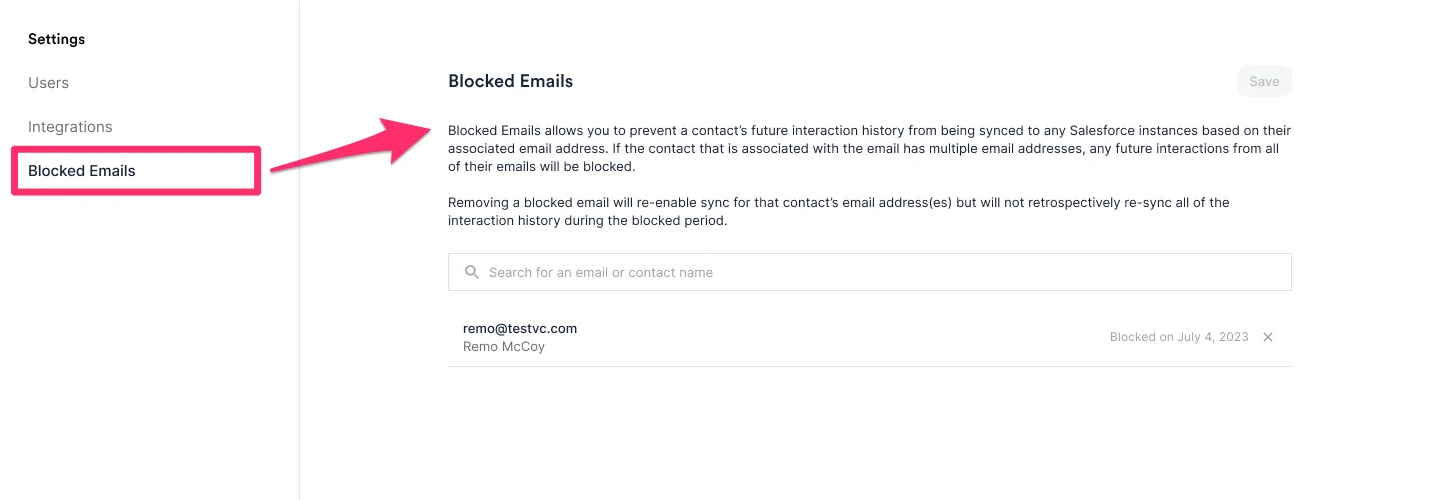
- You can also click on the Blocked Emails tab and add contacts here whose interactions you would like to prevent from syncing to Salesforce moving forward.
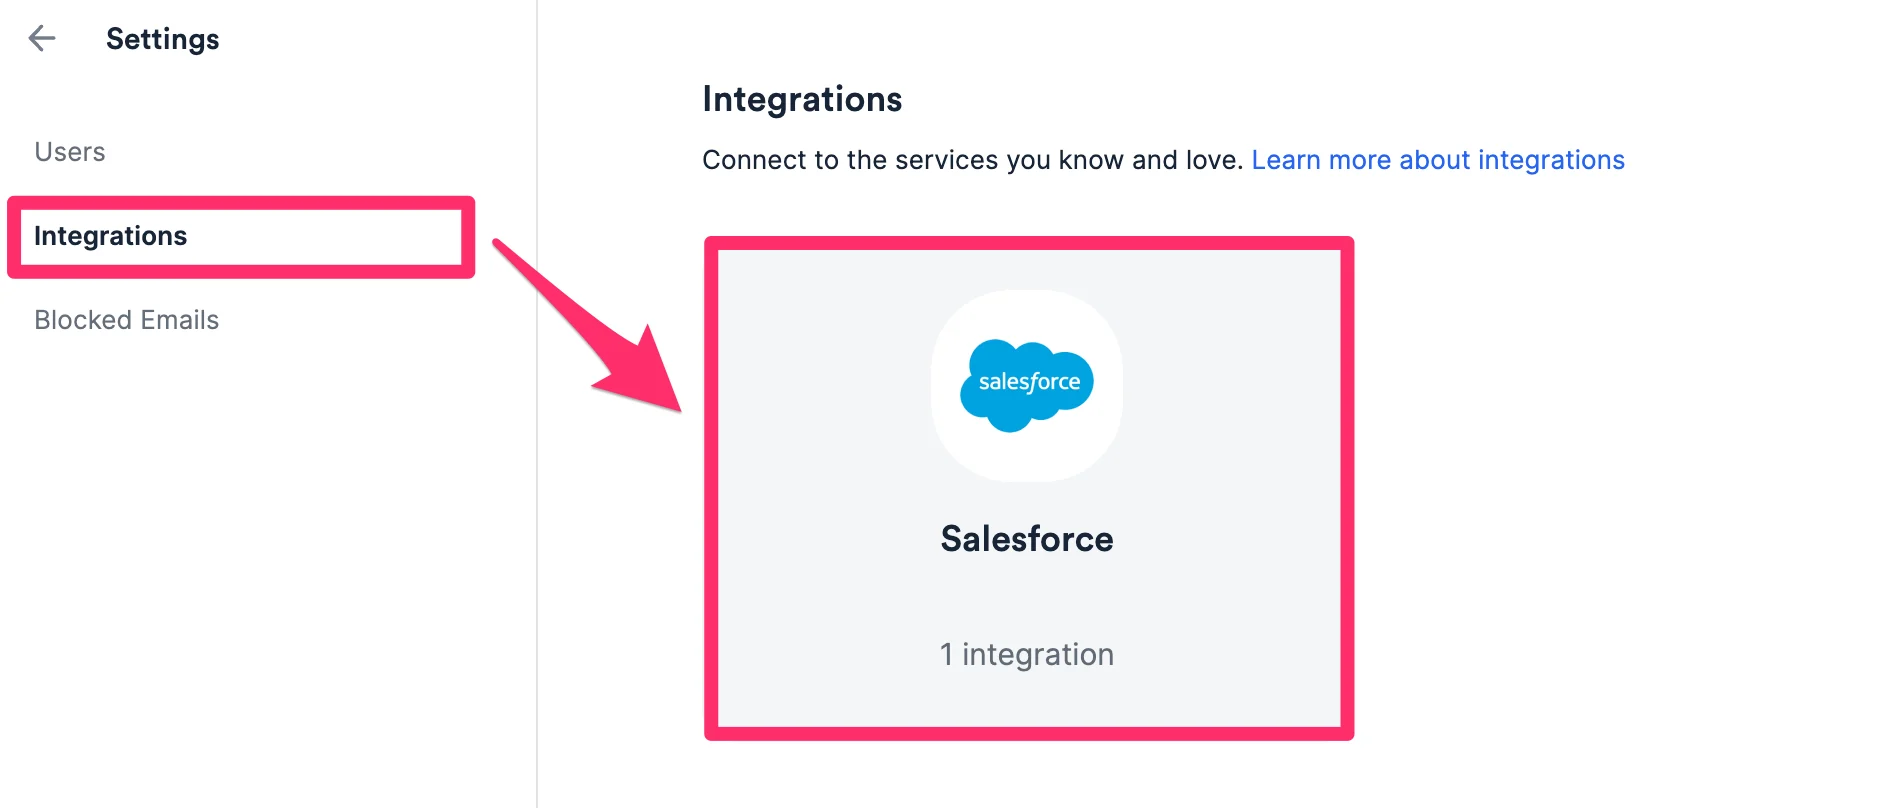
- Once you’ve added all the emails you’d like to hide communications for, click on the Integrations tab on the left, then click on Salesforce.
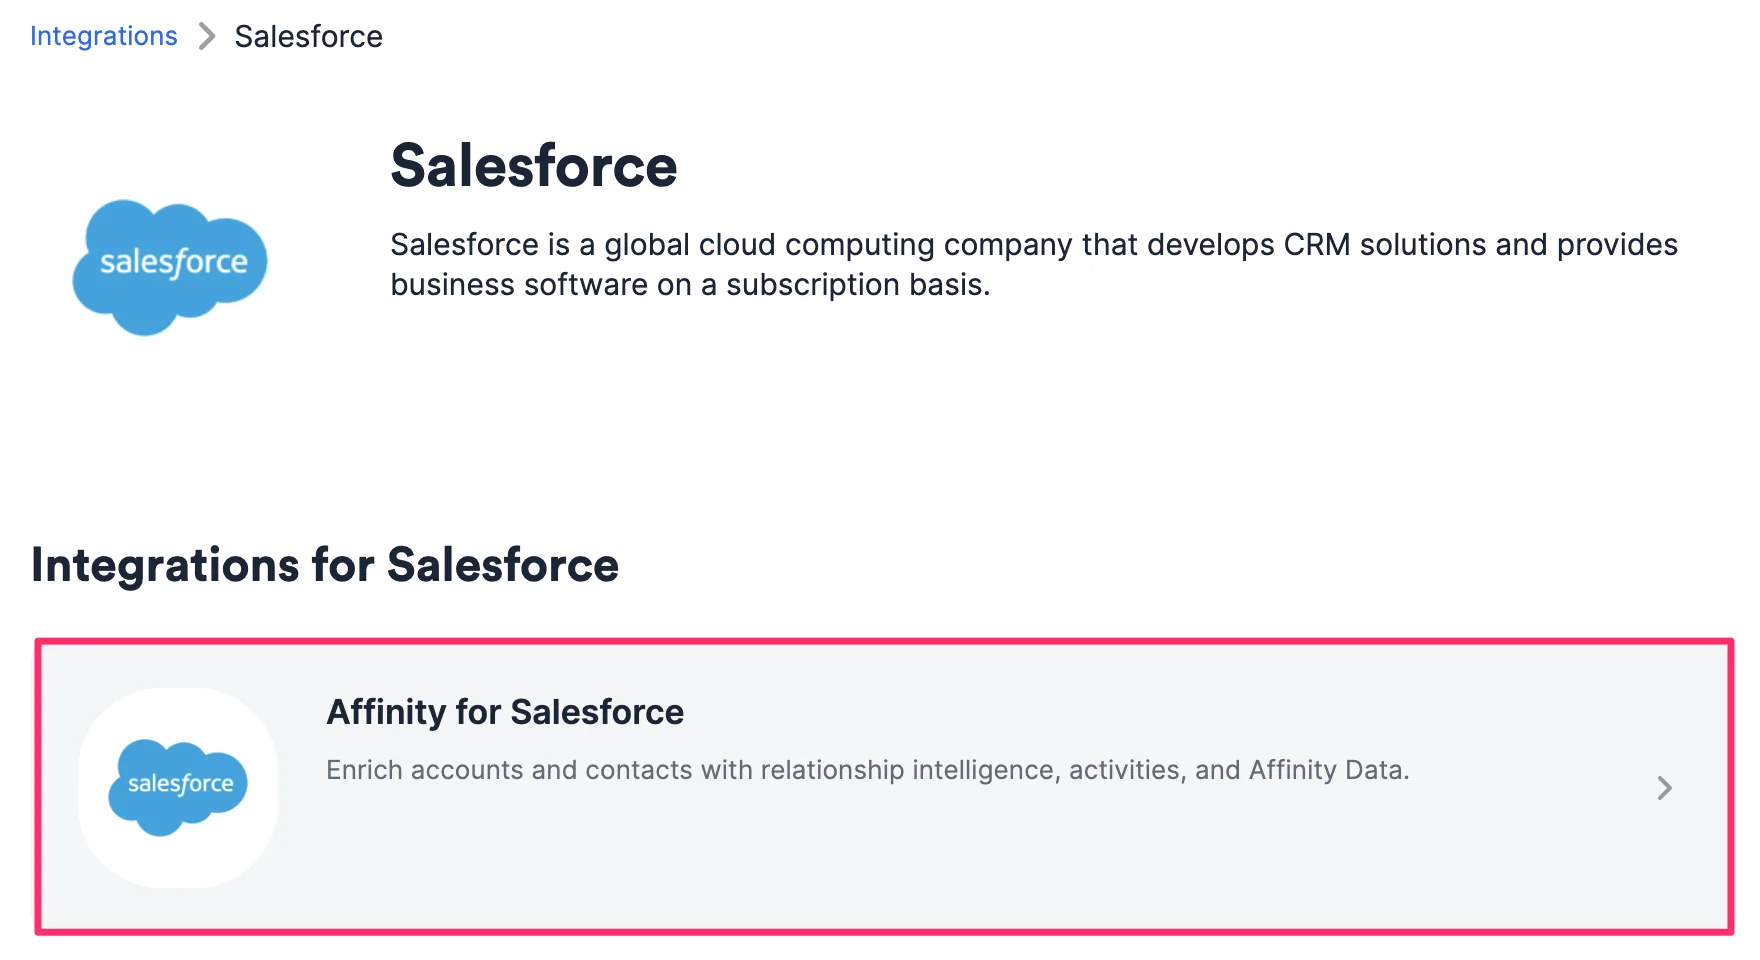
- Click on Affinity for Salesforce to get started with the set up process.
- You’ll see that you can connect Affinity to both Production and Sandbox versions of your Salesforce instances by clicking one of the relevant buttons: Create Production Configuration or Create Sandbox Configuration.
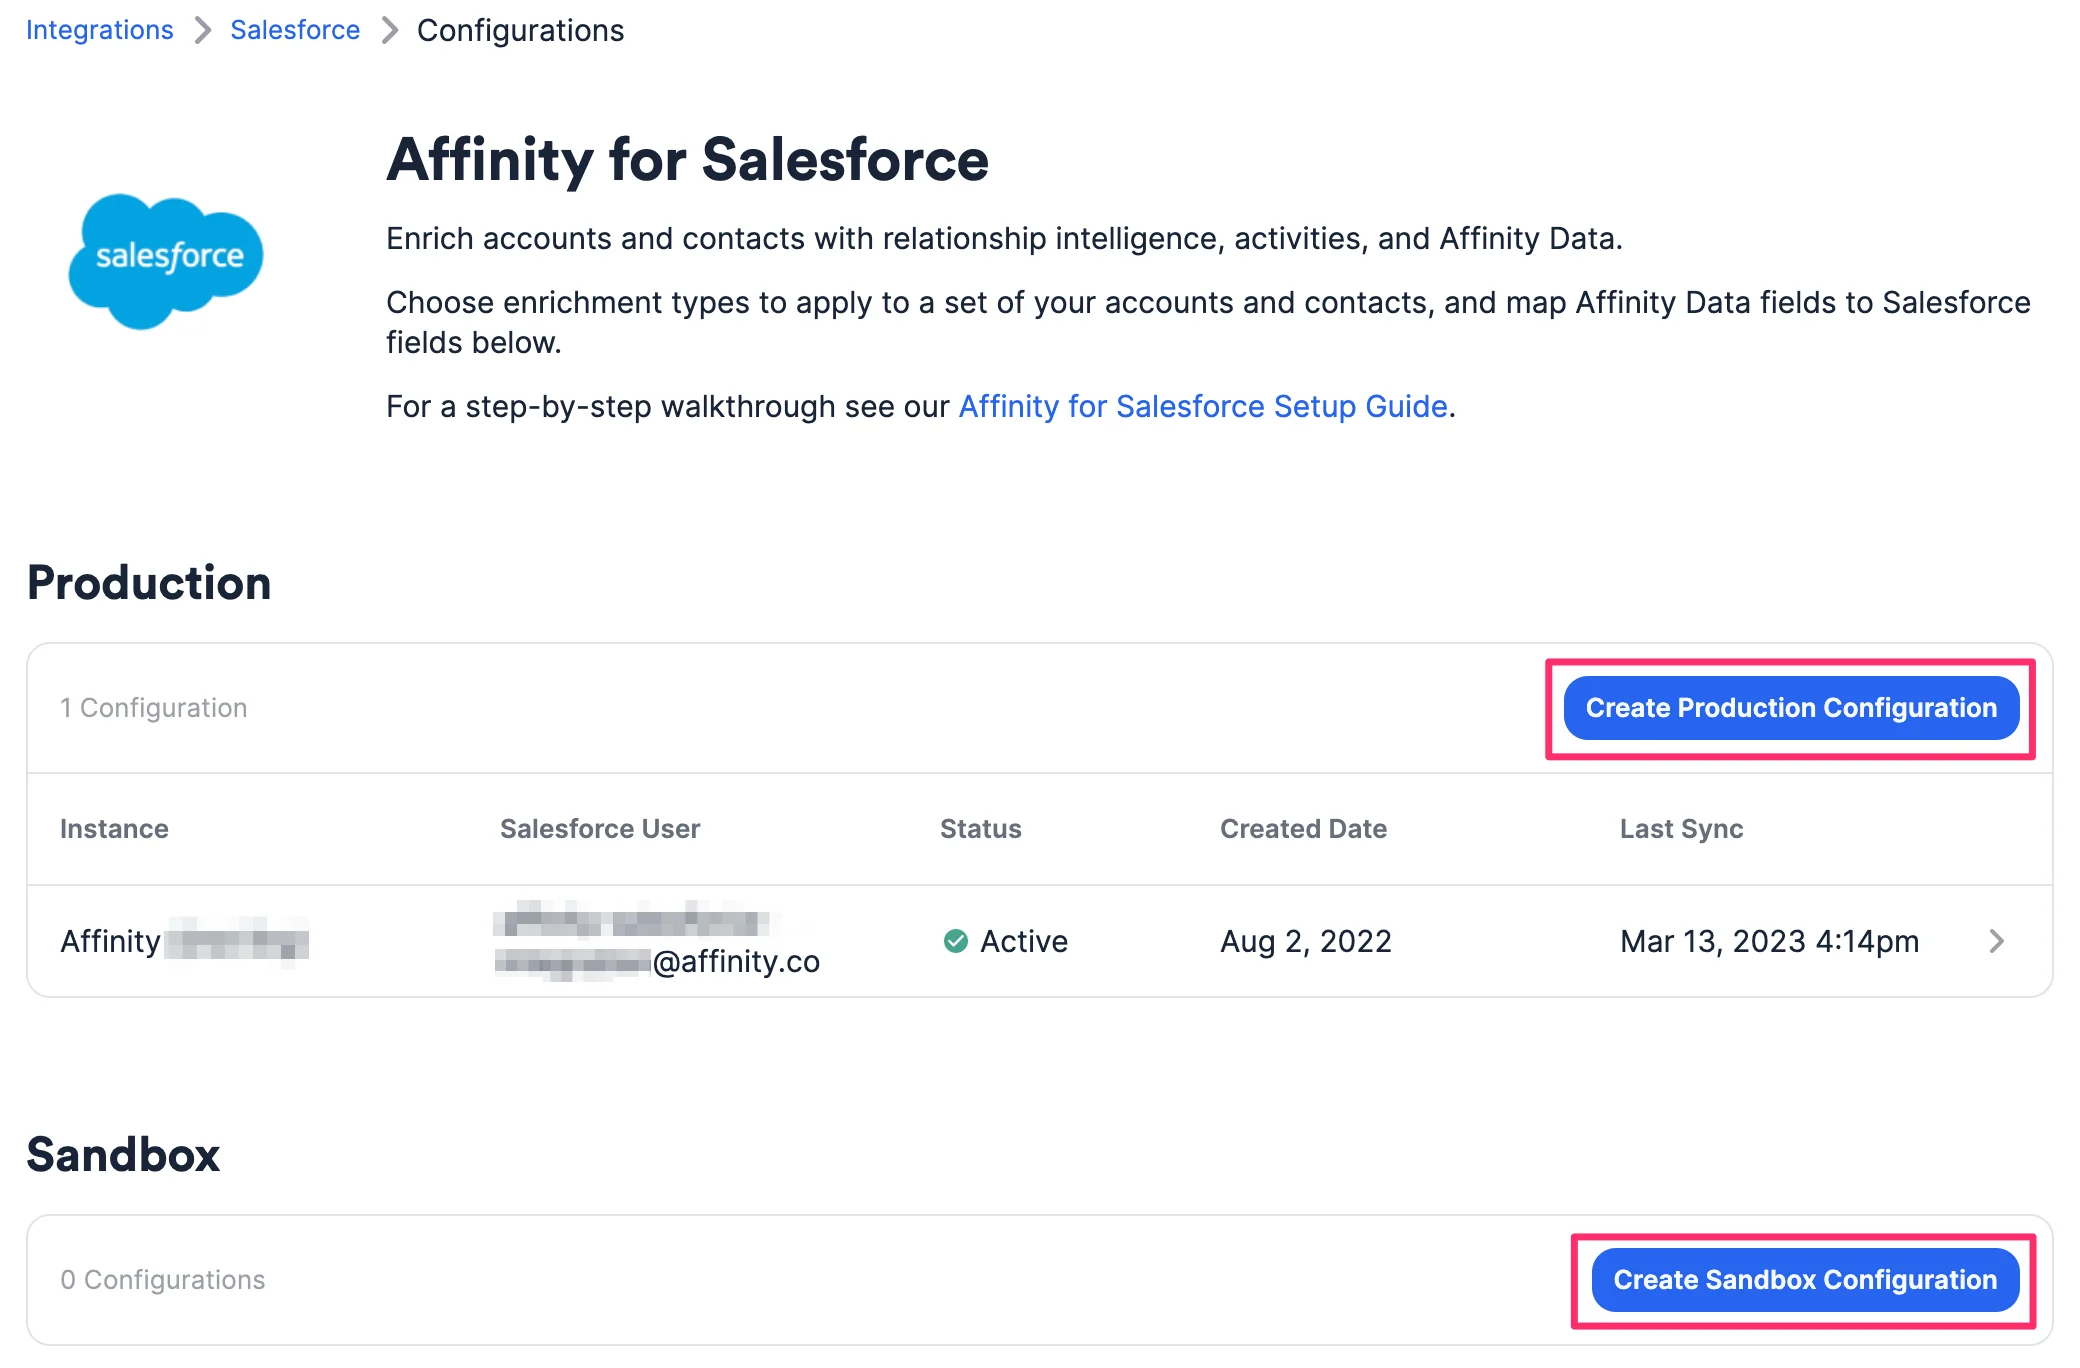
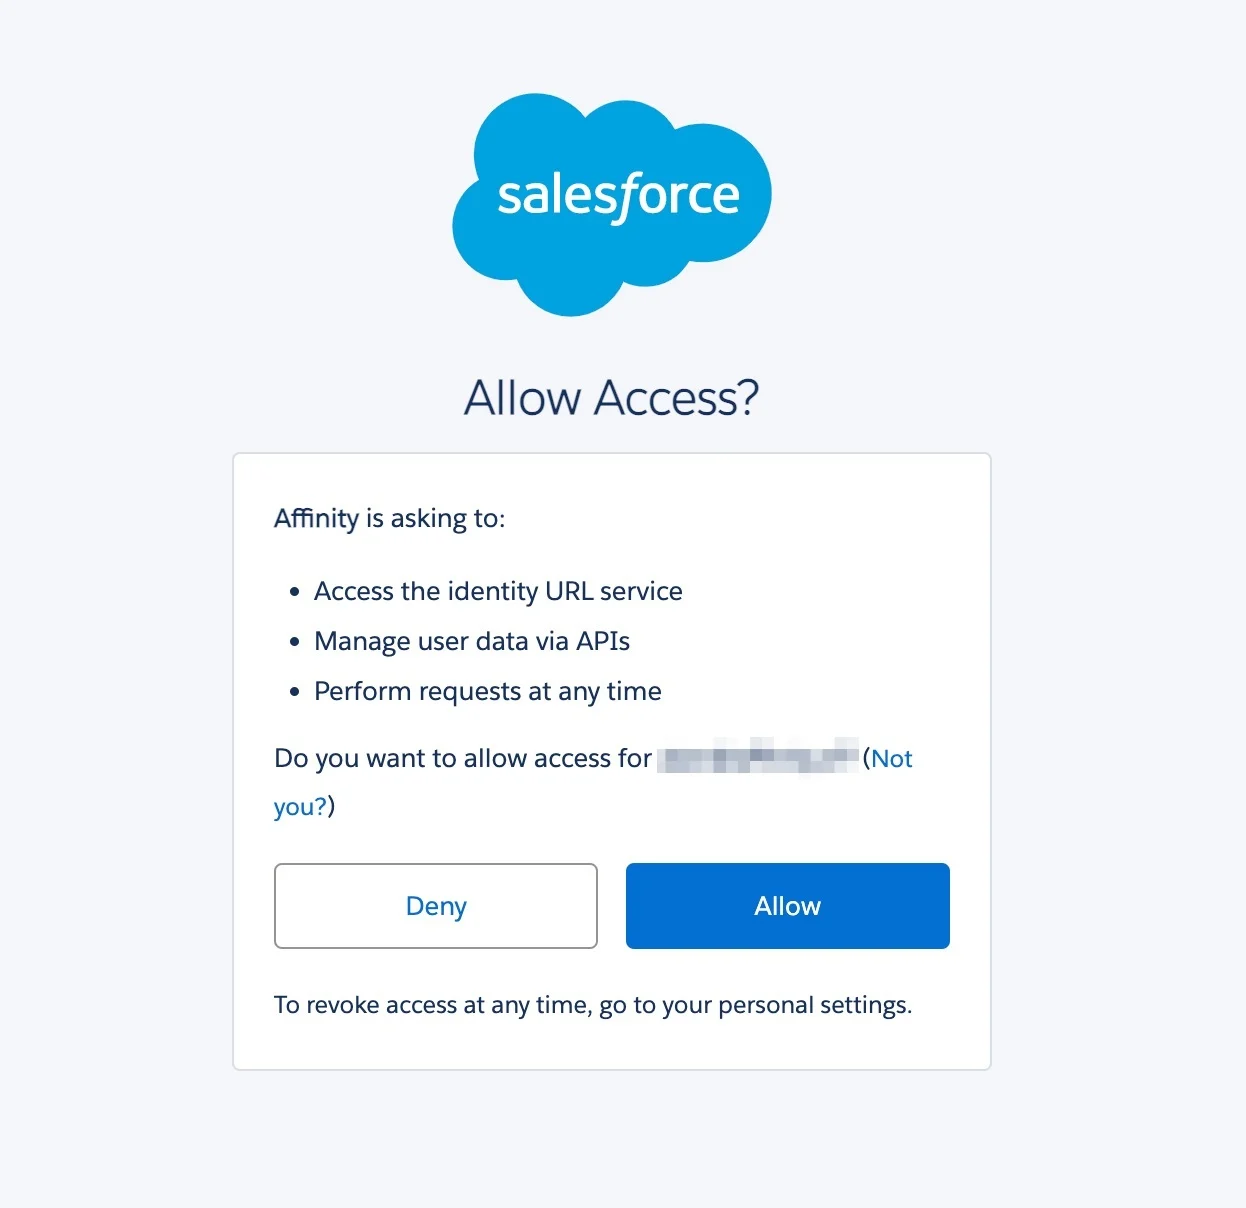
- You will see a webpage titled Allow Access?, where you can click Allow to continue.
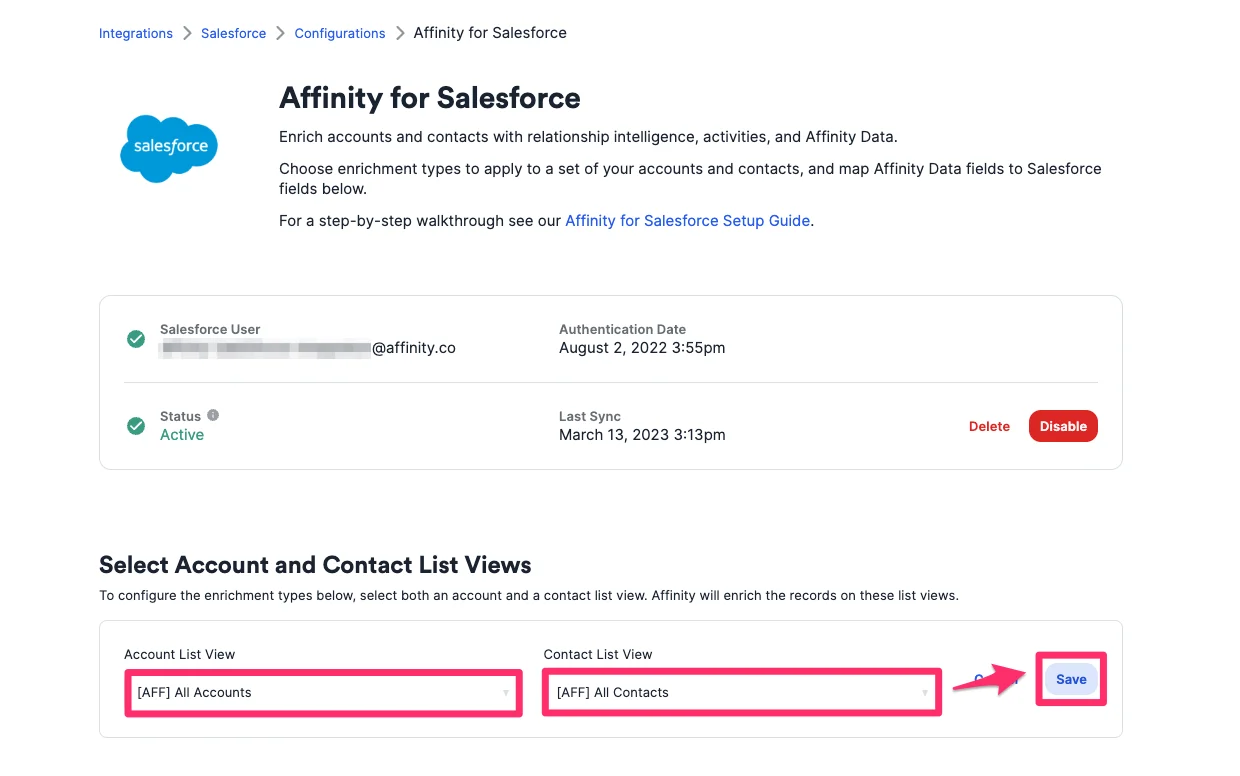
- Once you’ve connected your Salesforce instance, go to the section titled Select Account and Contact List Views and select the account list view and contact list view you’d like to enrich with Affinity Data, then click Save.
- Set up Enrichment Types
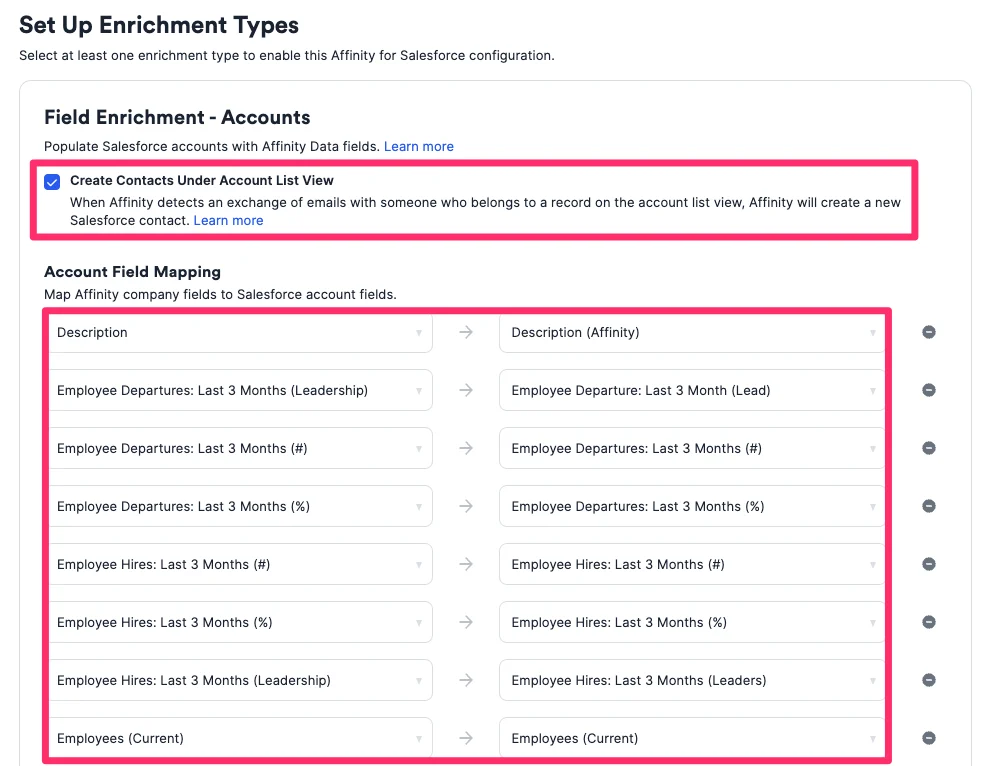
- Field Enrichment - Accounts: Click the Edit button, then click the checkbox to Create Contacts Under Account List View - this will help auto-create contacts on Salesforce based on your email interactions. Then, map the custom Salesforce fields you already created for your account objects to the Affinity Data fields.
- Repeat Step 8.1, but for Field Enrichment - Contacts this time.
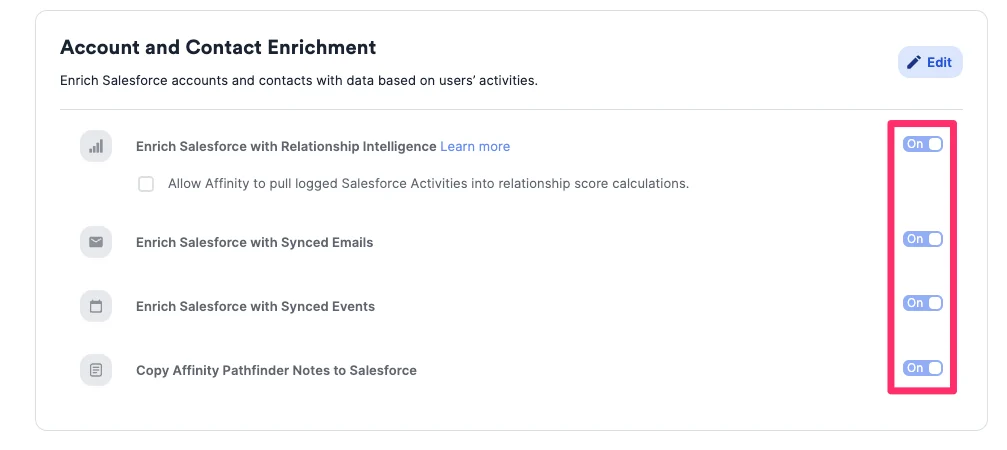
- Account and Contact Enrichment: Select the enrichment options for your Salesforce instance. Most users will have all of these enabled. Additionally, you can also check the box to Allow Affinity to pull logged Salesforce Activities into relationship score calculations.
- Note: If you’re using another tool to sync email/calendar data, you can leave the toggles off for those two options. Otherwise, we highly suggest having all enrichment options toggled on for maximum benefit.
- Note: If you’re using another tool to sync email/calendar data, you can leave the toggles off for those two options. Otherwise, we highly suggest having all enrichment options toggled on for maximum benefit.
- Opportunity Enrichment: Click Edit to toggle on enrichment for your Salesforce opportunities.
- Field Enrichment - Accounts: Click the Edit button, then click the checkbox to Create Contacts Under Account List View - this will help auto-create contacts on Salesforce based on your email interactions. Then, map the custom Salesforce fields you already created for your account objects to the Affinity Data fields.

- You can choose to either enrich the most recently created opportunity or the last modified opportunity. Finally, click Save and you’re all set.

Set up page layouts in your Salesforce instance
Part 1 - Setting up page layouts for Account objects
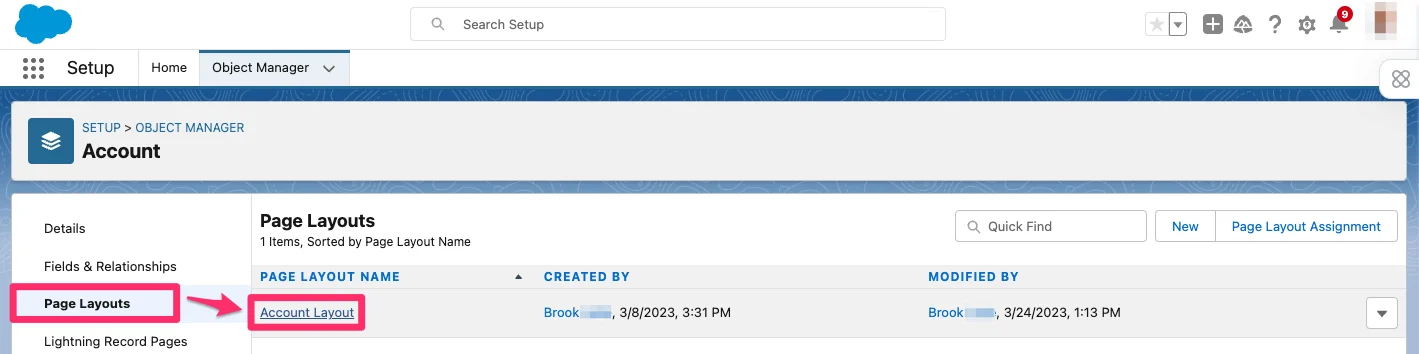
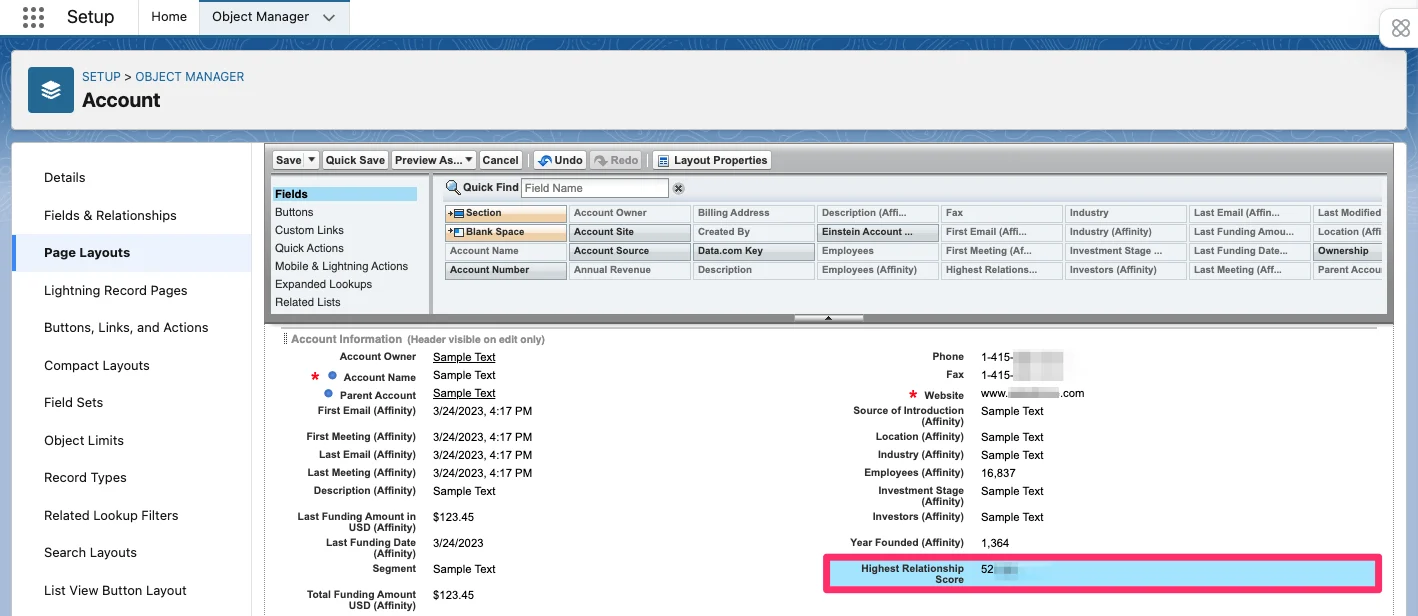
- Go to Setup, then click Object Manager, then click Account.
- In the Account object, click the Page Layouts tab on the left sidebar, then click Account Layout.
- Create a new section within the Account Layout so that you can place the custom Salesforce fields you previously created into this new section.
- Within the Fields tab, you’ll see the custom Salesforce fields you recently created. Drag-and-drop these fields onto this new section.
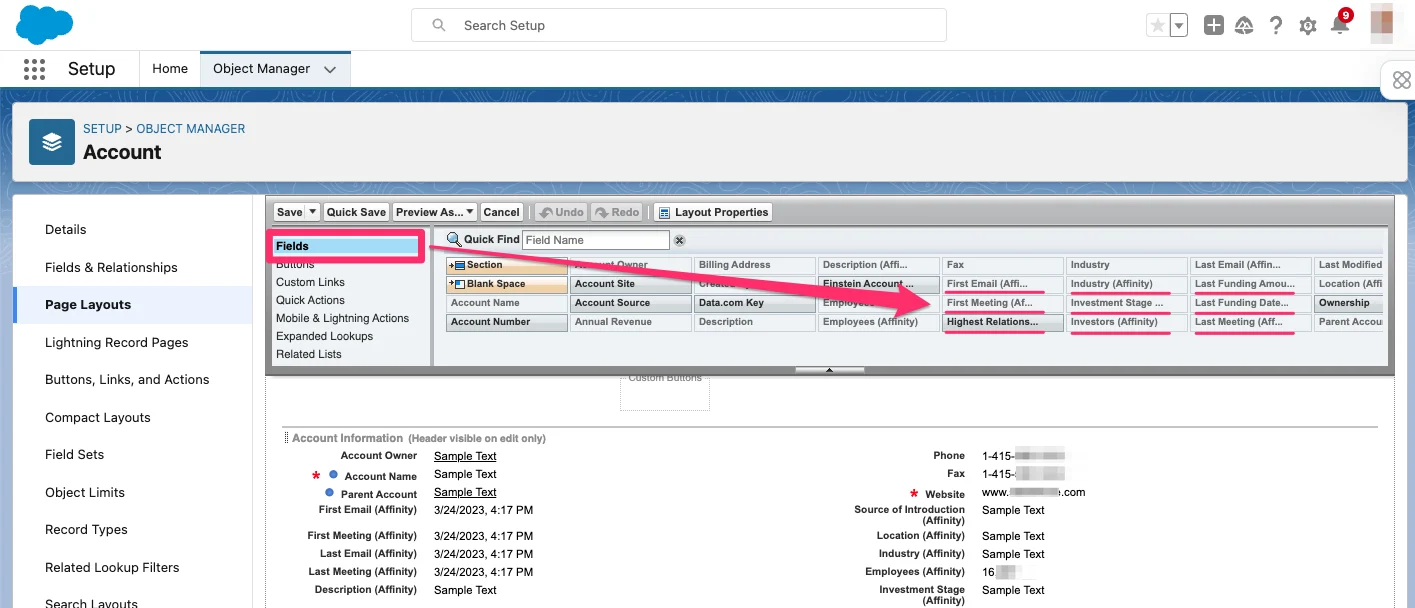
-
You’ll also notice the Highest Relationship Score provided by Affinity, which didn’t appear during the Field Mapping process in the previous section.
- We highly suggest leveraging the Highest Relationship Score in your Account Layout so that you and your team members can easily tell the strengths of your/your team’s relationships with your accounts and contacts.
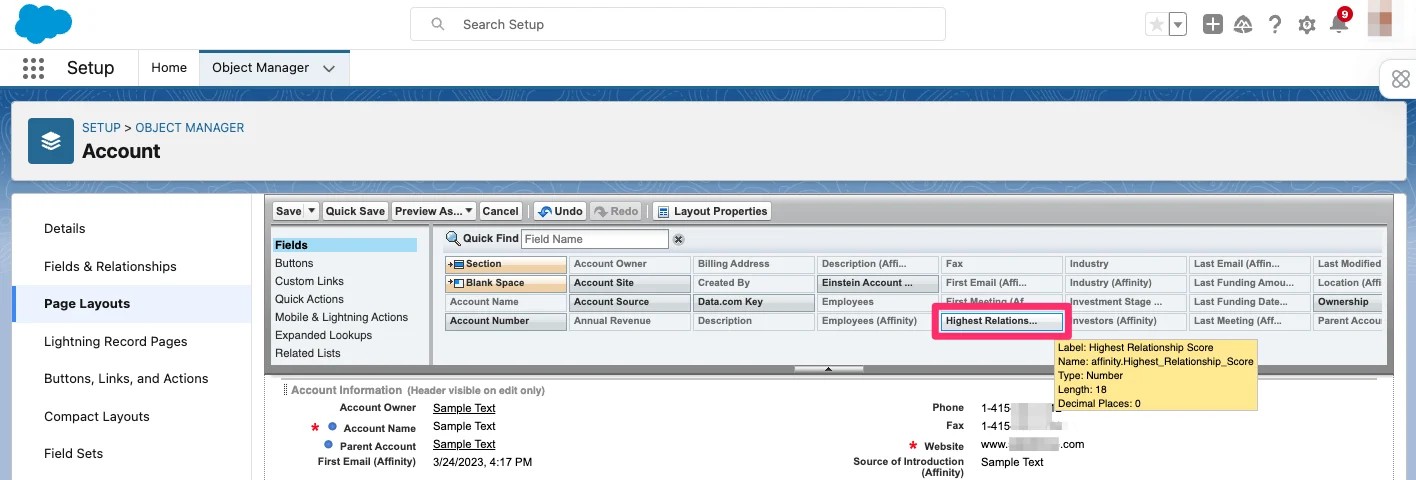
- Drag and drop the Highest Relationship Score field into the desired section.
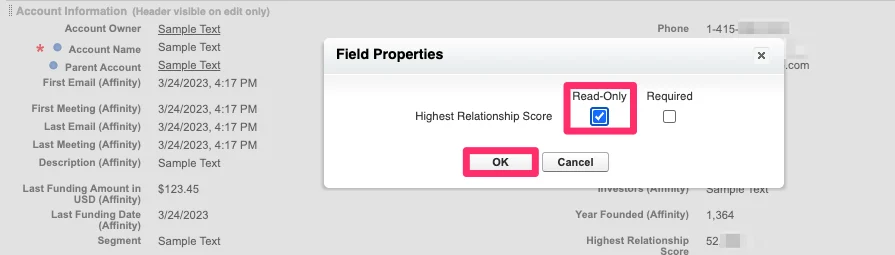
- To prevent accidental edits to the Highest Relationship Score values, click on the Edit icon and check the box for Read Only.
- We highly suggest leveraging the Highest Relationship Score in your Account Layout so that you and your team members can easily tell the strengths of your/your team’s relationships with your accounts and contacts.
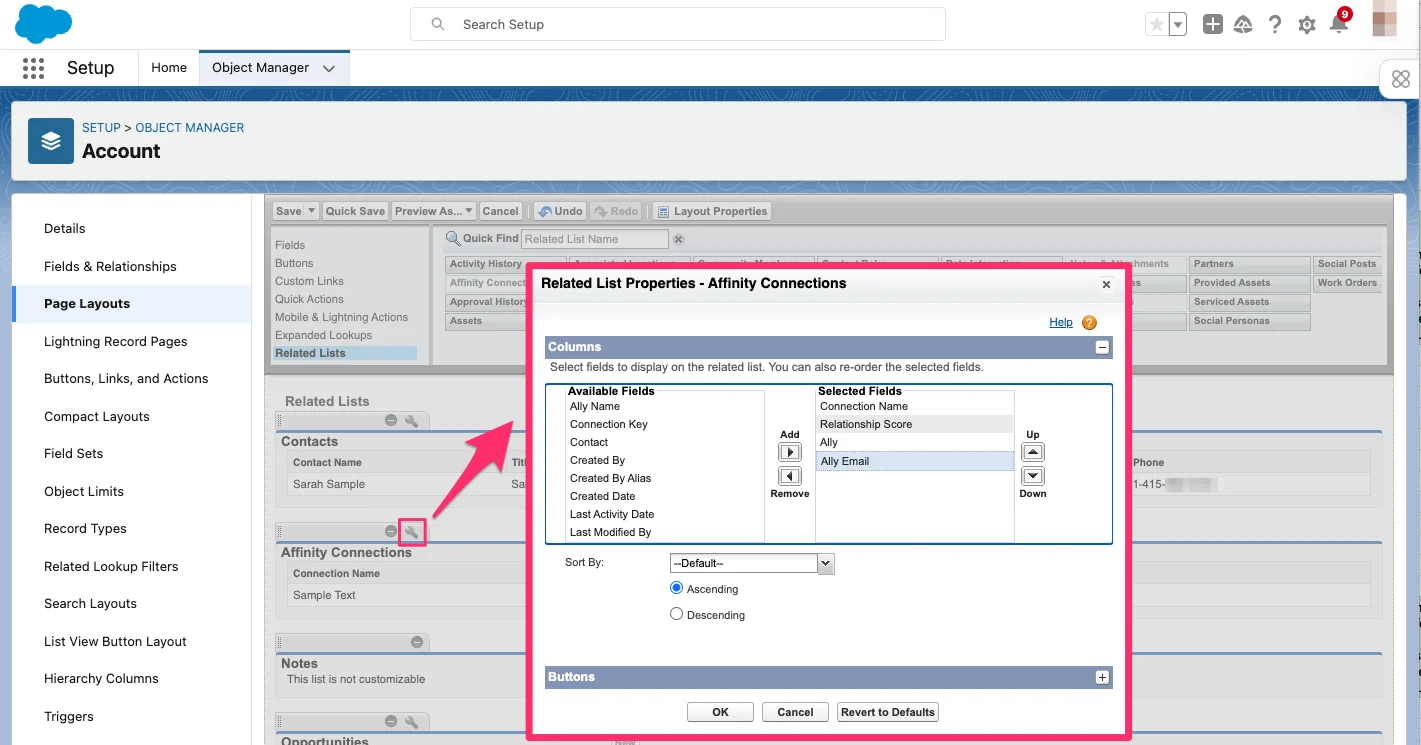
- Scroll down to the Related Lists tab, where you’ll find the custom object Affinity Connections that you can drag-and-drop under Related Lists.
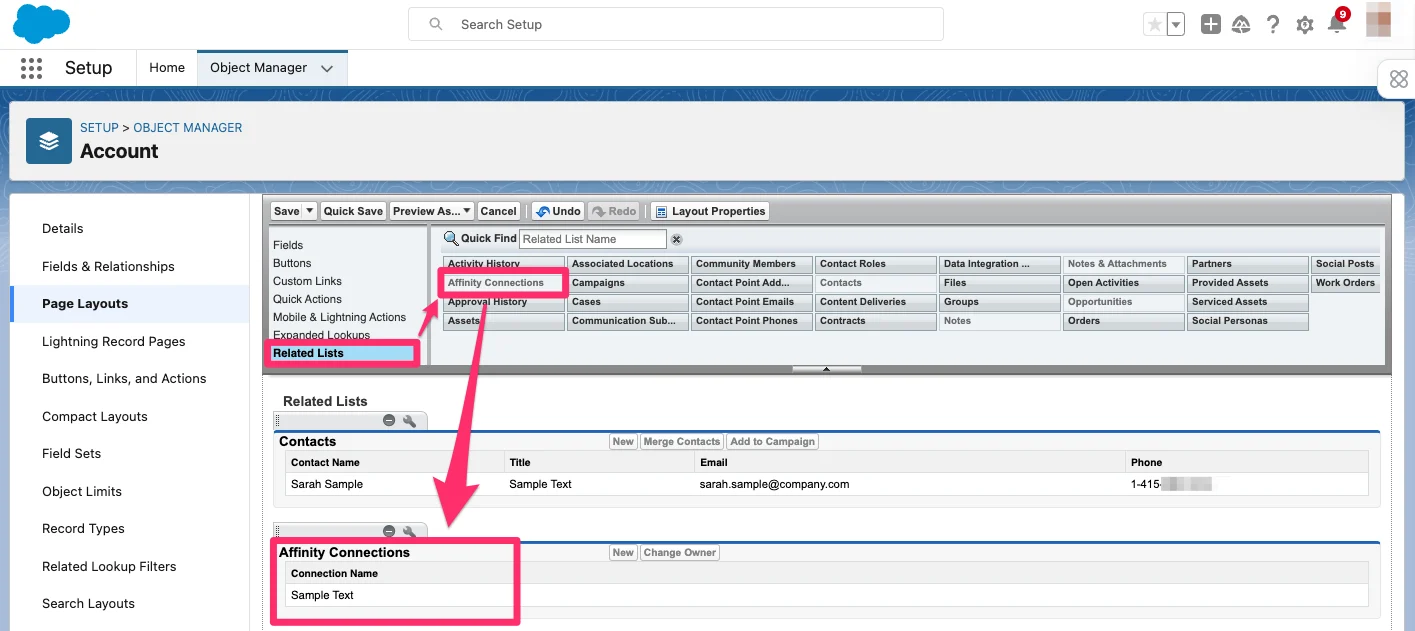
- Click the Edit icon next to Affinity Connections, which will allow you to select which Affinity fields to show and which field to sort by.