

How-to — task-oriented recipe.
Note: This video contains the old navigation bar on the top, whereas the current navigation bar now lies on the left side of your screen. While the remaining content is still the same, rest assured that we will be updating our videos accordingly.
Data Points required based on the type of Affinity list
Depending on the type of list you’ll be importing into, please follow these guidelines:Importing into a people list?
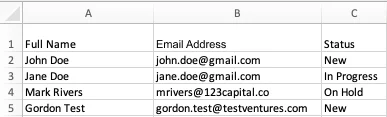
- You must include a Full Name column in your CSV file. If they’re separated by first and last names, then you can import them as two separate columns as well: First Name and Last Name.
- If a person has a longer last name (for example Jane Doe Van Lang) you can add two names to the First Name column and/or two names to the Last Name column.
- Don’t have a full name for some email addresses?
- Do not input the same exact placeholder for all of them (e.g. “Test Person” for 50 email addresses) - this will create one contact with all 50 email addresses combined into one profile.
- Instead, create a unique placeholder for each email address (e.g. “Test 1,” Test 2,” “Test 3,” etc.) to ensure they get created as separate profiles.
- We highly suggest also including an Email Address column so that Affinity can match these rows to the correct people in your directory.
- If some people do not have an email address, we will either attempt to match on name only (which has less accuracy due to common names) or create a new person.
Importing into an organization list?
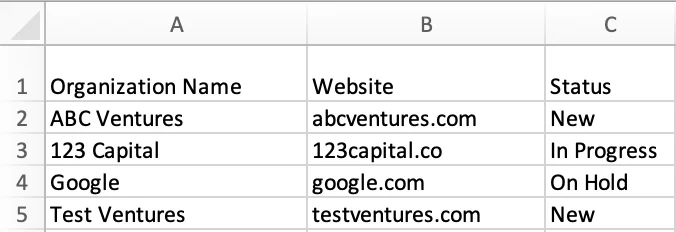
- You must include an Organization Name column in your CSV file.
- We highly suggest also including a Website column so that Affinity can match these rows to the correct organizations in your directory.
- If some organizations do not have a website, we will still create a new organization contact without a website - this is to minimize the chance of mapping to the wrong organization, which would only cause issues later on.
- You may add the correct website on these organizations’ profile pages anytime afterwards.
- If you find another profile that is enriched by Affinity and already has the website, please make sure to go to that profile page, then merge duplicates from there.
Importing into an opportunity list?

- You must include an Opportunity Name column (see Column A above) in your CSV file.
- Each opportunity name must be unique. Any duplicates will not be imported.
- Please remove any organizations without websites and people without email addresses.
- Otherwise, this may create duplicate records in Affinity, which would require manual merging later on.
- If there is an organization associated with each opportunity, make sure there is a column in the CSV file (see Column B above) dedicated to the organization in the following format: Organization Name <website>
- Please remove any commas (,) in this column to prevent the unwanted creation of blank organizations, since the comma (,) is being used as the delimiter.
- If there are people associated with each opportunity, make sure there is a column in the CSV file (see Column C above) dedicated to the people in the following format: Full Name1 <email address>; Full Name2 <email address>
Other Important Callouts
- Make sure your CSV file is saved in the CSV (UTF-8) format.
- The very first row (Row 1) of the CSV file must contain your column headers.
- Column header names must be unique - there cannot be any column headers with the exact same name.
- Column headers with line breaks will fail to properly upload to Affinity.
- Example: In** Column D**, you’ll notice two lines due to a line break.
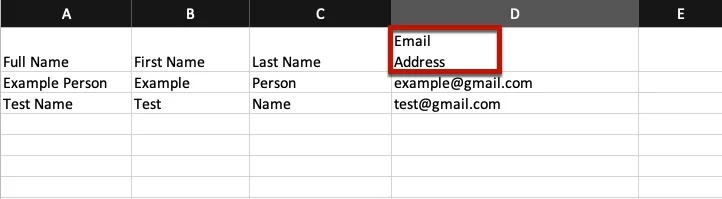
- Example: In** Column D**, you’ll notice two lines due to a line break.
- Please make sure that columns with no column headers in Row 1 are also empty from Rows 2 and beyond (e.g. If there is no data in cell E1, there should not be any data in cell E2 and below).
- Make sure you remove hyperlinks (e.g. the Email Address column).
- Remove any unwanted duplicate rows in your CSV file (e.g. If “ABC Ventures” is on Row 2, Row 3, and Row 5).
- If duplicates do exist and you either choose Append or Overwrite - the importer will only import the first entry of the duplicates (Row 2) while skipping the other duplicate entries (Row 3 and Row 5).
Understanding Dates in the Data Importer
Working with dates during import requires careful attention to formatting and your Affinity settings. Here’s what you need to know to ensure your dates import correctly.The Critical Importance of Your Date Format Setting
The most important rule: Your CSV date format must match your Affinity Date/Time setting. Before importing any dates, check your Date/Time format setting in Affinity:- Go to your Settings page in Affinity
- Look for your Date/Time format preference
- Note whether you have MM/DD/YYYY or DD/MM/YYYY selected
How Affinity Processes Date Imports
When you import dates, Affinity’s system reads each date value from your CSV and interprets it according to your Date/Time setting. Here’s what happens: Scenario 1: Date matches your setting- Your setting: DD/MM/YYYY
- CSV value: 05/01/2026
- Result: Imports as January 5, 2026 ✓
- Your setting: DD/MM/YYYY
- CSV value: 05/17/2026
- Result: Affinity detects this is invalid as DD/MM/YYYY format (month 17 doesn’t exist) but valid as MM/DD/YYYY format, so it flips the structure and imports as May 17, 2026
- Your setting: DD/MM/YYYY
- CSV value: 05/01/2026
- Result: This is valid in BOTH formats. Affinity will interpret it according to your setting as January 5, 2026 - even if you meant May 1, 2026
Supported Date Formats
Affinity recognizes the following date formats during import: Single-digit formats:- M/D/YYYY (e.g., 1/5/2026)
- D/M/YYYY (e.g., 5/1/2026)
- M/D/YY (e.g., 1/5/26)
- D/M/YY (e.g., 5/1/26)
- MM/DD/YYYY (e.g., 01/05/2026)
- DD/MM/YYYY (e.g., 05/01/2026)
- MM/DD/YY (e.g., 01/05/26)
- DD/MM/YY (e.g., 05/01/26)
- D MMM YYYY (e.g., 5 Jan 2026) - This format works regardless of your date/time setting and eliminates ambiguity
- M = Single digit month (1, 2, 3, … 12)
- MM = Double digit month (01, 02, 03, … 12)
- MMM = Abbreviated month text (Jan, Feb, Mar, … Dec)
- D = Single digit day (1, 2, 3, … 30, 31)
- DD = Double digit day (01, 02, 03, … 30, 31)
- YY = Two digit year (01 → 2001, 26 → 2026)
- YYYY = Four digit year (1995, 2026)
Import Validation and Warnings
During the import process, Affinity validates a sample of your date data (3 rows per column) to check for potential issues. You may see a warning message that reads: “Column contains invalid dates or is missing data, some recognized dates may be corrected automatically. Please proceed with caution.” This warning appears when the sample dates don’t match any of the recognized formats listed above. Affinity will attempt to correct the dates automatically by flipping day/month values when appropriate. You should review your data carefully before starting the import.Best Practices for Date Imports
- Always check your Date/Time setting first - Before preparing your CSV, verify which format your Affinity account is set to use (MM/DD/YYYY or DD/MM/YYYY)
- Use consistent formatting - Ensure all dates in your CSV use the same format throughout
- Prefer four-digit years - YYYY format (2026) is clearer than YY format (26)
- Use text months for clarity - The format “D MMM YYYY” (e.g., “5 Jan 2026”) works regardless of your date/time setting and eliminates ambiguity between MM/DD/YYYY and DD/MM/YYYY
- Test with a small sample - If unsure, try importing a few rows first to verify dates are interpreted correctly
- Remove Excel formulas - Export to CSV format, which strips formulas and leaves only the final date values